In this Solasta Crown of the Magister Beginner’s Guide, I’m going to discuss 10 tips that can make your experience with Solasta more enjoyable. Solasta is a tactical turn-based RPG, which is based on Dungeons & Dragons 5th Edition, more specifically the SRD 5.1 Ruleset. With this, you’re able to customize your party, gain new Features at specific levels, and obtain new Equipment to further improve your builds.
Solasta Crown of the Magister Beginner’s Guide: 10 Tips You Should Know Before You Play
In Solasta Crown of the Magister, players will choose their Ancestry or Race, Class, Background, Abilities, and Proficiencies in the form of Skills and Tools. As they start exploring the world and interacting with multiple Factions, they obtain Weapons and Armor to enhance their party’s capabilities. There are a couple of relevant strategies that can help you gain better gear, fight enemies effectively, and utilize Short and Long Rest. I’ll start with the Factions and what their main role is in the game.
10. Know What Equipment Factions Are Selling
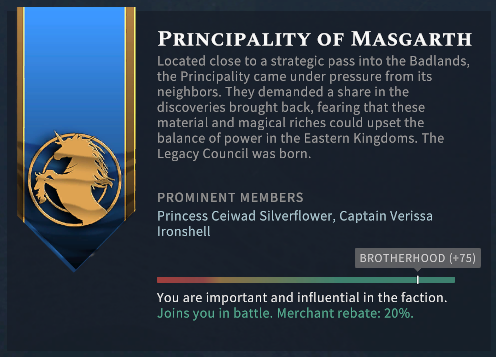
There are six available Factions, which are represented by at least one NPC in Caer Cyflen. Your goal is to determine the most essential Factions for your party. The reason is that each of them sells unique and powerful Equipment that could improve your party. For instance, you can buy the Belt of Giant Strength (Hill) from Halman Summer of the Antiquarians whereas you’re able to purchase Shield +2 from Joriel Foxeye of the Circle of Danantar.

In order to improve your relationship or Reputation with them, you’ll have to give artifacts like tomes and journals that they’re interested in. The higher the Reputation the better, because not only does this grant you access to the best Weapons and Armor out there, but you also get discounts. Gold can’t easily be earned in the game so this is definitely a treat.
9. Familiarize Yourself With Crafting
Crafting is an important aspect in Solasta because it allows you to prepare useful Consumables to prepare you in Combat. This comprises three main steps. First, you’ll need to determine which among the several Crafting Options are accessible based on your proficiency. This proficiency is based on the Class and Background you’ve selected in Character Creation. Once determined, you’ll have to obtain its equivalent items like the Poisoner’s Kit and Scroll Kit, through merchants. Second, you’ll need to acquire and to read recipes in order to craft the consumables you’re interested in. And third, you’ll have to collect required Ingredients so you can begin crafting.
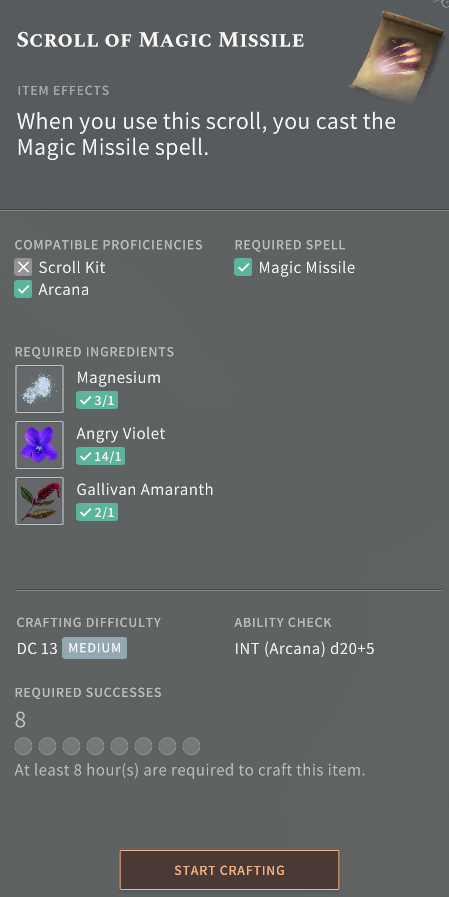 It’s best to trigger this activity when you’re about to travel or to perform a Short or Long Rest since it takes several hours of successful dice rolls to finish one consumable, and you’re only able to craft one item at a time. Note that while traveling, you can interrupt the journey to create additional consumables.
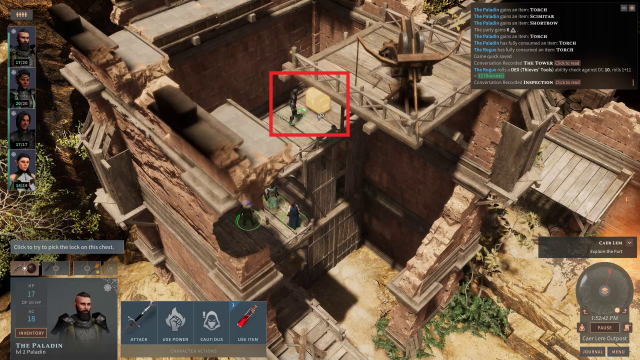
8. Always Interact With Highlighted Objects
Whether you’re exploring the Caer Lem Outpost or the Ruined Tower of Manacalon, you’ll come across objects that you can interact with. To identify the ones that are pertinent, simply hold the ALT key at all times and then approach highlighted objects in question. These provide you with better Equipmen, or consumables such as Thieves’ Tools to disarm traps and to unlock chests. You can then sell lesser versions of the Weapons and Armor you have to earn gold.
7. Identify Items With Magical Properties
During your explorations, you’ll also come across objects that seem ordinary. You may even be tempted to sell these because it doesn’t appear as useful as it should be. In order to sort relevant items, you’ll need the Detect Magic and Identify Ritual Spells. Ritual Spells can be cast outside of combat to discover the hidden properties of an object. Out of all the Classes, only the Wizard and Cleric have a dedicated “Ritual Button”, which prevents them from using up their Spell Slots every time they cast these types of Spells.
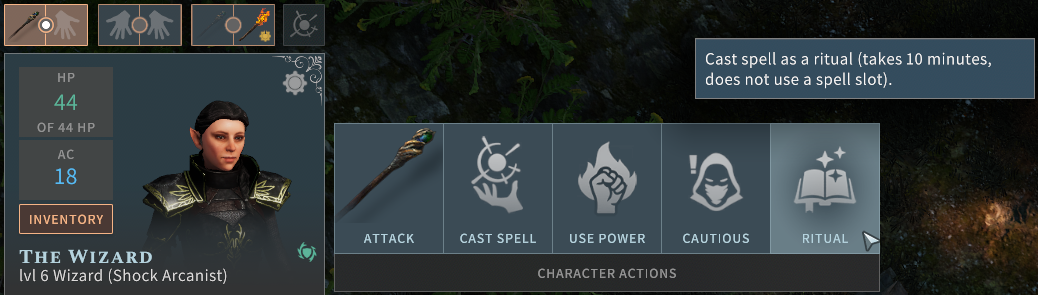
Detect Magic determines any magical object in your inventory and is usually indicated with a question mark at the top left hand side of the item. Alternatively, you can easily recognize magical items because they have keywords such as Unidentified and Magnificent. These allow you to choose other Spells that are essential in combat rather than investing in Detect Magic. Meanwhile, Identify ascertains the special properties of those items and reveals what they can do. Almost always, these pieces of gear are higher versions of what you’re currently using, so keep an eye out for them and don’t accidentally sell them.
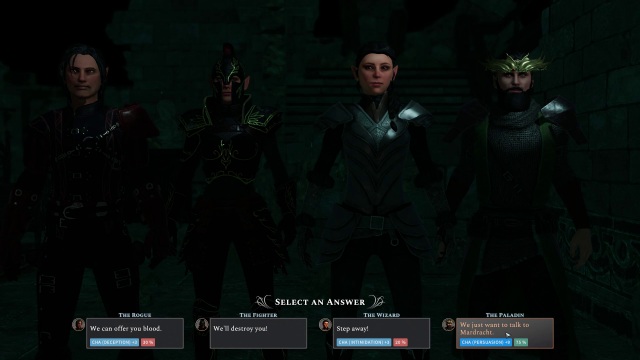
6. Know When To Fight Or When To Negotiate
In Solasta, some encounters provide you with the option to fight or to negotiate with hostile NPCs, and the XP you gain from either of these options is the same. From time to time, if you wish to spare yourself the trouble of engaging in lengthy combat encounters because of how challenging bosses can be, then do so by all means.
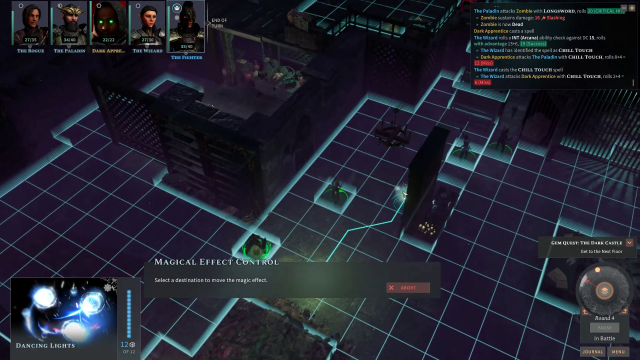
5. Identify Spells With M, S, V Components
There are six available Classes and most of the time, depending on the Subclass you choose at higher levels, you’ll be casting Spells to gain Advantage, to debuff enemies, or to strengthen the party. Some Spells require you to wear “M” or Material Components such as a Holy Symbol (Amulet), Wand, or Component Pouch in order to activate them.
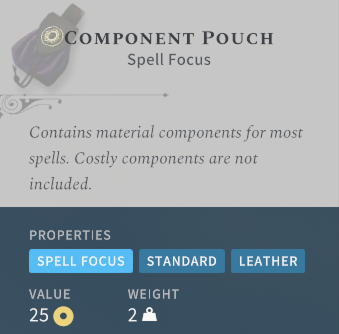
Examples of these include Dancing Lights, Color Spray, and Shield of Faith. If you don’t have it yet, you’ll have to purchase one from Gorim Ironsoot in Caer Cyflen. Note that by default, only the Wizard, Paladin and Cleric Classes start out with Spell Focus Accessories.
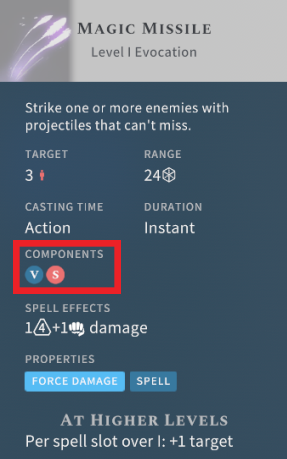
Meanwhile, other Spells have the “S” or Somatic Component tag. Because of this, it necessitates that you should have a free hand available to cast them. Examples are offensive Spells like Chill Touch, Ray of Frost, and Magic Missile.
To identify Spells with different requirements, hover over their respective icons and press and hold the ALT key. Under Components, you’ll notice three letters, namely V, S and M, which correspond to what we’ve discussed. For “V” or Verbal Component, you’ll have to avoid being silenced, otherwise you won’t be able to utter the Spell’s incantation. You’ll have to make sure to satisfy all of these Components in order to cast Spells.
4. Plan Your Position Carefully
When it comes to combat, there are a number of ways you can strategically plan your party’s moves and positions in order to dominate. First is Initiative.
Initiative
Rolling for Initiative determines who among the characters, may it be from your party or that of the enemy’s, get to attack first in combat. Usually, they’re the Rogues and Rangers who possess high Dexterity. Depending on your builds, you can position them on higher ground or have them stealthily move near the enemy, ready to strike. It’s also important to examine the Initiative queue because this determines who will attack next. You can also identify your fiercest competitors so you can eliminate or destabilize them as soon as possible.
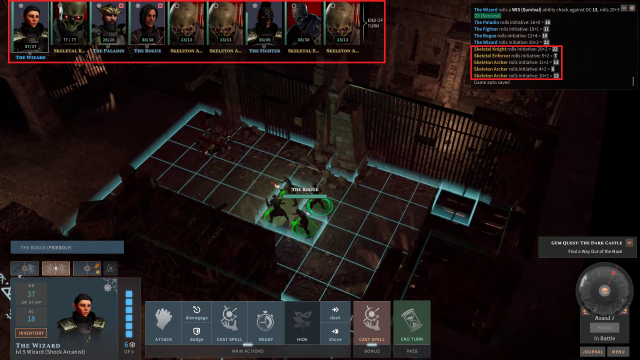
Surprise Attacks
Surprise Attacks are caused by suddenly attacking unsuspecting enemies. As a result, they don’t engage in combat until the second round, giving one full round to your party. This largely benefits you because you can easily pick them off. Surprising enemies included being in “Cautious Mode” to stealthily move or to have another party member distract them prior to attacking from behind. As long as they don’t see you first, you’ll successfully surprise them. Just remember that enemies can also surprise you especially when you’re traveling from one location to the next.
Note that Surprise Attacks are different from Sneak Attacks. The former doesn’t grant extra damage per se whereas the latter does. I’ll be talking more about Sneak Attacks in the next section.
Spreading Out
Before rushing into an encounter, you should spread out your party. For example, the Rogue can perform Sneak Attacks, which allow them to deal extra damage. This happens when they gain Advantage on their Attack Roll by successfully remaining undetected and using a Ranged Weapon or Melee Weapon with the Finesse Property.
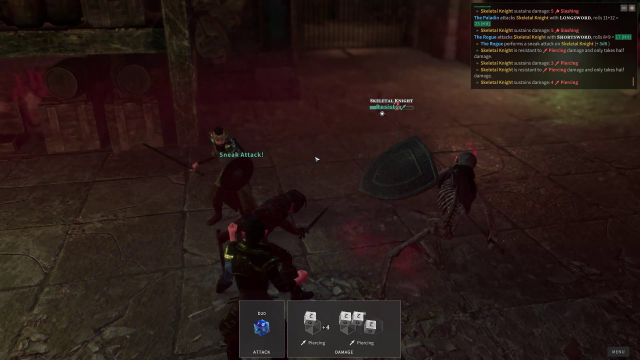
Additionally, spreading out also lessens the chances of being hit by AoE Actions or Spells like Burning Hands and Lightning Bolt, which are both detrimental to your party.
High Ground
One of the most important things you can do is situating your party on higher ground as this automatically provides you with Advantage on Attack Rolls, thereby increasing the chances of successfully hitting enemies. The reason is that you can clearly see them giving you full visibility of where to attack best. Classes that wield Ranged Weapons or cast Ranged Spells greatly benefit from this because not only do they gain Advantage, but they also impose Disadvantage on Ranged Attacks of enemies on lower ground. If for instance an enemy moves beside you, you can simply use Shove to push them away from where you’re standing. Chances are if the elevation is high, you’ll instantly kill them.
3. Always Have Stable Light Sources
Because encounters frequently occur in the dark, you’ll need to have stable sources of light to prevent taking Disadvantage on your Attack Rolls. If you don’t do this it will be more difficult for your attacks to hit because you cannot see enemies properly. You can either cast the Dancing Lights Cantrip or equip the Torch. Between the two however, the Cantrip is better because you can control its movement and you don’t have to concern yourself with switching from one Equipment Set to the other in order to cast Spells with the Somatic Component.
2. Utilize All Actions Per Turn
In combat, you perform three Actions, namely a Main Action, Bonus Action, and Movement. As much as possible, use all of these in a single turn so you can maximize the potential of your party in order to efficiently kill enemies. Main Actions are usually Melee and Ranged Attacks or Spells while Bonus Actions can be Class-specific Features that allow you to dodge or to regain HP. Some Classes get multiple attacks per turn at later levels, so pay attention and make sure they get both attacks off.
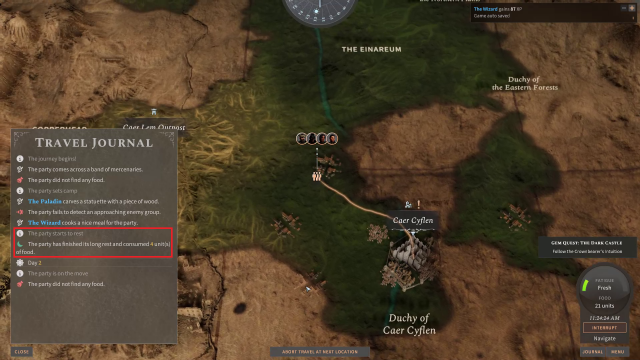
1. Make Use of Short and Long Rest
There are only two ways to restore HP, Spell Slots, and Class-specific Features and these are by engaging in Short or Long Rest. To activate Short Rest, click the Sitting Icon beside Pause at the lower right hand side of the screen. This can only be performed if the area you’re in is safe. To activate Long Rest, you’ll need to rent a room, find a campfire, or travel to another location. Like in D&D 5E, food is important to fully recover and to gain back your strength so remember to stock up on a lot of this, especially before traveling.
Moreover, when performing either activity, you can attune one piece of gear to any of your party members so they can gain its perks. Note that you’re limited to attuning a total of three pieces of Equipment per character.
Once you’ve familiarized yourself with these 10 tips, you’ll be able to enhance your builds and to explore the world of Solasta more efficiently.
Stay tuned for Build Guides, and be sure to check out the Solasta Crown of the Magister Wiki if you have questions about the game!
Fextralife
Source link
Related Post:
- Dungeons & Dragons Dark Alliance Beginner’s Guide: Top 10 Tips You Should Know Before You Play
- Monster Hunter Stories 2 Beginner’s Guide: Top 10 Tips You Should Know Before You Play
- Solasta Crown of the Magister Review Impressions: A Faithful D&D 5E Adaptation
- A New Classic RPG in 2024 – Solasta: Crown of the Magister
- The best Solasta: Crown of the Magister mods
- Sorcerer Update Coming to Solasta: Crown of the Magister July 13th
- Tormented Souls — Beginner tips you should know before playing
- Biomutant: 10 Things You Should Know Before Playing Guide
- Crown of the Magister’s free Sorcerer update adds a fiery class
- The Ascent Tips and Tricks Guide: Top 10 Things All Players Should Know