In this Solasta Crown of the Magister Fighter Guide I’m going to discuss my Spellblade Fighter Build, and show you what works in terms of choosing the best Ancestry or Race, Background, Abilities and a lot more. If you’ve been looking for a way to play as a Fighter that does massive damage with Weapons and Spells, then this Guide is for you.
Solasta Crown of the Magister Fighter Build Guide – (Spellblade)
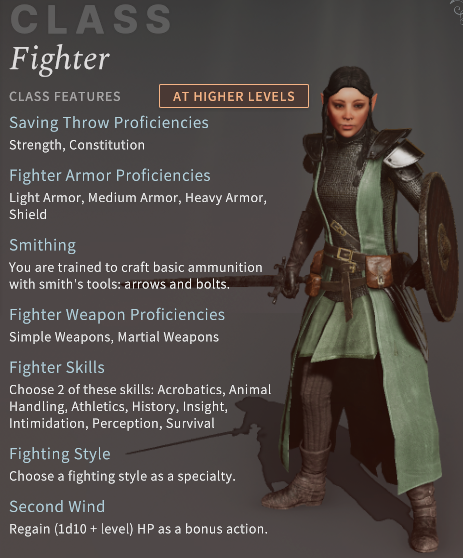
Fighters are superior warriors because of their familiarity with several Fighting Styles. Strength-based Fighters rely on a number of Weapons to deal substantial Melee Damage while some are Dexterity-based who wield Bows for Ranged Attacks. Meanwhile, others are hybrids who incorporate their knowledge of magic to cast Spells on top of using their Melee or Ranged Weapons. Their Proficiency with Simple and Martial Weapons and all Armor, which includes the Shield, are some of the reasons why they’re well-rounded in Combat.
As a Spellblade Fighter, you’ll focus on Strength and Intelligence to increase hit chances with Melee Weapons and Spells, respectively. Furthermore, you’ll be dropping Ranged Weapons since you need to free up your Secondary Equipment Set in order to cast Spells with the Somatic Component, which requires a free hand to do so.
When you fight enemies who are resistant or immune to non-magical attacks, your Weapon becomes magical because of the Magic Weapon Feature therefore disregarding the Disadvantage imposed by said enemies. Disadvantage is a mechanic, which makes you roll a D20 or 20-sided die twice for an Attack Roll, Ability Check, or Saving Throw. Having Disadvantage means you’ll be using the lower value. In this instance, your hit chance will not be negatively impacted.
Fighter Character Creation
In this section, we’ll discuss the best Fighter’s Ancestry, Background, Abilities, Skills, and Language to choose in Character Creation.
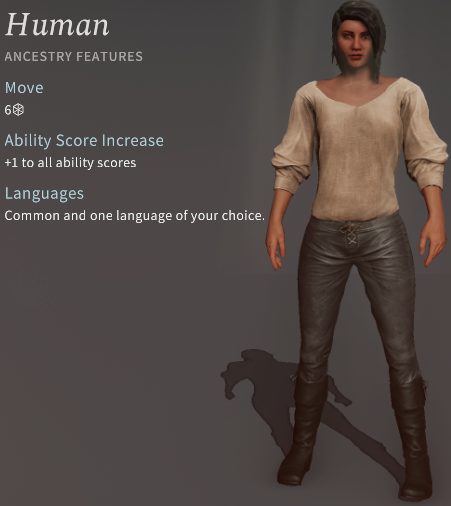
Ancestry
Humans are the supreme choice for Spellblade Fighters because they receive +1 to all of their Ability Scores. The additional +1 Intelligence is important in order to increase the chances of landing your Spells. Note that you won’t be needing Dexterity since you’ll fully rely on Spells to deal damage at range. Furthermore, this won’t increase your Armor Class (AC) when you equip Heavy Armor.
Background
When it comes to Background, I recommend choosing Academic. This makes you proficient in Arcana, Nature and Insight, with Arcana being the most useful among the three. Arcana allows you to craft Scrolls such as the Scroll of Magic Missile to preserve your Spell Slots for more essential Spells. These slots are diminished every time you cast a Spell. You’re also considered a Runaway Antiquarian, which further improves your reputation with the Antiquarian Faction in order to buy unique Equipment from. Lastly, you have Proficiency with the Manacalon Rosary, which you can use to enchant Weapons and Armor.

Abilities
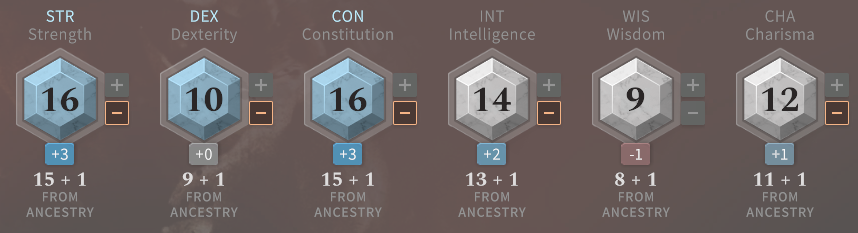
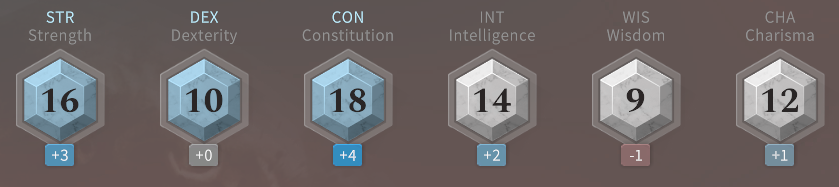
In this guide, I’ll be making use of the Point Buy Ability Generation System instead of Dice Rolls so I can control the points I allot for each Ability. With the Spellblade Fighter, what you would want to focus on is to raise your Strength to 16 since you’ll primarily use a Melee Weapon to attack and to deal huge amounts of burst damage when you’re near enemies. Additionally, your carrying capacity becomes bearable, which is good considering the Heavy Armor, One-Handed Weapon, and Shield you’ll be taking with you.
Next, you’ll have to increase Intelligence to a moderate score of 14 since you can acquire the Headband of Intellect, which boosts this Ability to 19 later on in the game. At earlier levels, 14 Intelligence is sufficient in ensuring that the Spells you cast will land on your enemies. In order to improve your character’s durability, you’ll need to raise your max HP by increasing Constitution to 16. This puts your starting HP at 13.
Lastly, since you don’t need to increase your Dexterity that much, you can set it to 10 to reduce the chances of going last in combat. This prevents you from losing a bit of momentum in quickly eliminating enemies. The rest of your points can then be distributed between Wisdom and Charisma.
With Point Buy, your Ability Score spread should look like this:
Fighting Style
Fighters being versatile warriors, get to choose a Fighting Style to specialize in. I recommend selecting Dueling since you’ll be using a One-Handed Weapon and a Shield. This will give you the highest damage possible because of the +2 bonus you get for all of your Melee Damage Rolls. On the other hand, if you feel like your AC is low and you keep getting hit because of it, you can choose Defense to receive a +1 bonus to AC.
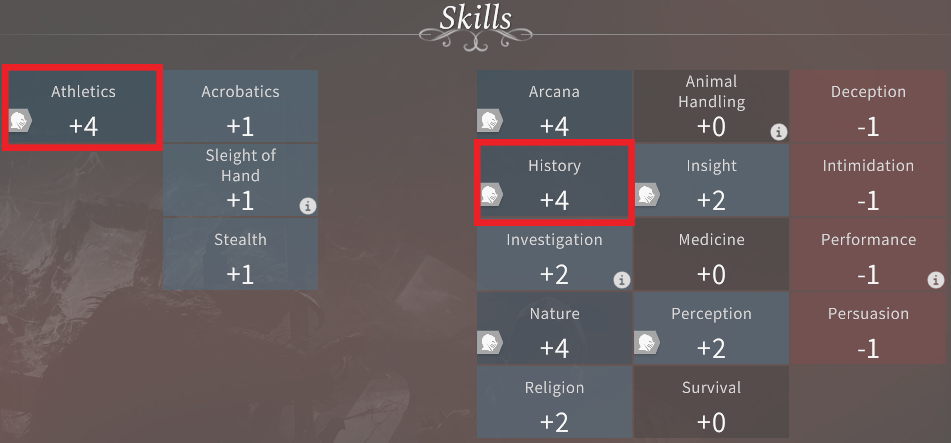
Skills
For Skills, I recommend choosing Athletics and History. Athletics increases your jump range so you can leap across longer distances. You can also climb on hazardous terrain with ease. Meanwhile, History helps you recall lore about historical events, places and people, which are useful when you’re trying to decipher clues in quests.
Language
You can choose any Language you want.
Fighter Level 1 Second Wind
You gain Second Wind, which provides a bonus of 1-10 HP plus your current level, to your total HP. This is an excellent burst heal that can save your butt if you’re in trouble.
Fighter Level 2 Action Surge
At Level 2, you gain Action Surge, which allows you to perform another Main Action during your turn. It’s best to use this during crucial turns, like when you’re close to finishing off an enemy, in order to at remove a dangerous threat. You can only replenish this after every Short or Long Rest so use it wisely, and don’t waste it when you will be fine without it.

Fighter Level 3 Martial Archetypes, Cantrips, and Spells
Martial Archetype
Level 3 is the most essential level for your Fighter because you’ll finally choose your desired Martial Archetype. Let’s go through these Archetypes one by one. The Mountaineer heavily relies on how well you offensively and defensively utilize your Shield, which doesn’t considerably raise the damage you deal. You gain Advantage when you attempt to Shove enemies with it. You also get an additional +2 AC when you’re near a wall. But since you won’t be next to a wall all the time, you cannot rely on this bonus. This brings us to the second Archetype, which is Champion.
Champion improves the chances of landing Critical Hits with the Improved Critical Feature. Champions are able to attack with a Critical Hit if their roll is equal to 19 or 20. When you trigger this, you’ll get to perform an extra damage roll, which can sometimes double your damage or more.
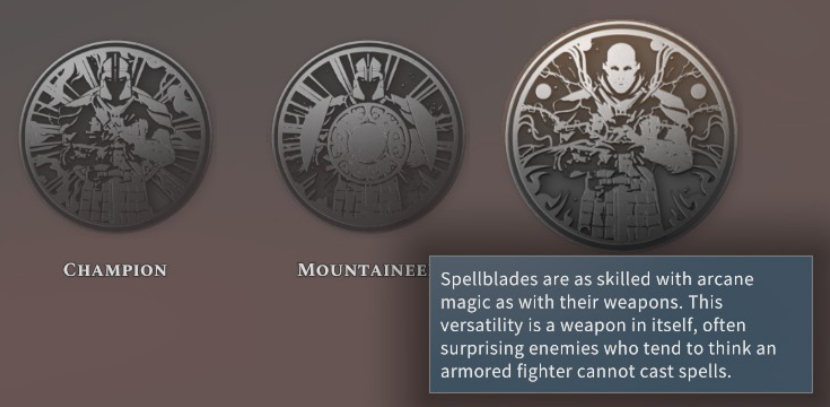
This brings us to our chosen Archetype, which is Spellblade. Unlike Champions, Spellblades are stable and consistent because they don’t rely on Critical Hits to deal massive amounts of damage. As a Spellblade Fighter, you can cast some Spells from the Wizard Spell List, which contains a lot of good Melee and Ranged Spells. As mentioned previously, this Archetype imbues your Weapon with magic when you hit enemies who are immune to non-magical attacks allowing your attack to push through. Note that Spells need to be “Prepared”, otherwise, you won’t be able to use them in combat. In Solasta, you can only prepare Spells once after every Long Rest.
Additionally, you can select two more Cantrips and three Level 1 Spells.
Cantrip
As a Human at Level 3, you can choose two Cantrips. Cantrips are cast without expending any Spell Slot, which means that you can these every turn if you wish. Remember to switch to your Secondary Equipment Set so you have a free hand in order to cast a Cantrip or Spell. Switching between Primary and Secondary Equipment Sets is a free Action in combat, but you can only do this once per turn, so plan accordingly.
I highly recommend picking the Dancing Lights Cantrip because the bulk of encounters take place in the dark. It lets you summon a wisp of light, which you can control for 1 minute to illuminate enemies. Since you’ll be able to clearly see them, you won’t incur a Disadvantage when you attack them, which can really hurt your potential damage.
Additionally, this Cantrip requires Concentration to remain active. Concentration is broken if you cast another Cantrip or Spell that also requires Concentration. For example, if Dancing Lights is active and you decide to cast Hideous Laughter, then Hideous Laughter will be the active Spell. Moreover, when you take damage while a Cantrip or Spell that requires Concentration is active, you’ll need to make a Constitution Saving Throw and succeed to maintain its effect, otherwise you’ll have to recast it. This is where a high Constitution comes in handy in order to increase your Saving Throw’s success rate.
When casting Dancing Lights, make sure to have a Material Component such as the Component Pouch equipped. Otherwise, you won’t be able to cast this Cantrip. You can purchase the pouch from Gorim Ironsoot at Caer Cyflen.
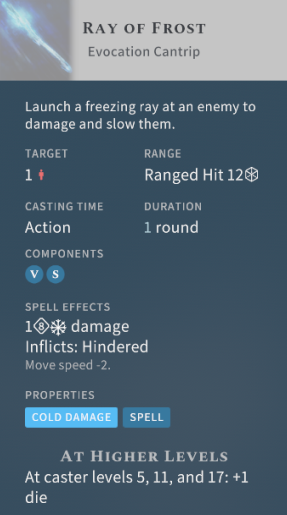
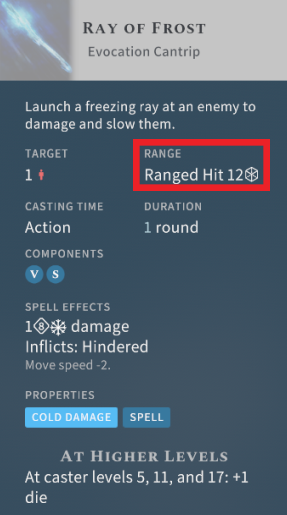
Next is Ray of Frost, which is a Ranged Spell that deals 1-8 Cold Damage and inflicts Hindered, which reduces the target’s Speed by 2. This is a good Spell to have when you cannot reach an enemy, or it would be better to finish off a weak enemy you are not engaged with.
Spells
For Spells, I suggest selecting the following:
 Magic Missile deals 2-5 Force Damage via the three projectiles being thrown at one or multiple targets. Note that these don’t miss, making this one of the best overall spells in the game early on.
 Burning Hands is an AoE Spell that deals 3-18 conal Fire Damage. It’s perfect for a Spellblade that uses melee because you’ll be in range to hit enemies often. Just be careful not to cast this when your allies are in front of you, otherwise, they can also be damaged by this Spell.
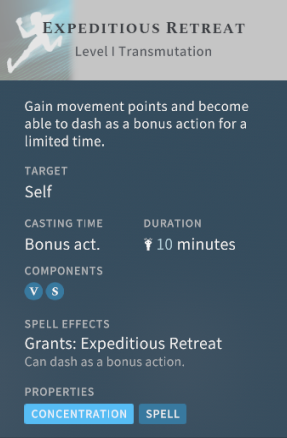
For the third Spell, you can choose Jump, Expeditious Retreat, or Thunderwave. Jump lets you touch a party member to increase their jumping distance. This is particularly useful if they need to escape from enemy attacks or if they intend to get loot that’s too far away. Expeditious Retreat is a Bonus Action that gives you additional Movement with Dash for 10 minutes to rush towards and to attack enemies with your Melee Weapon or to cast Burning Hands. You can also use this to avoid them should you need to preserve your remaining HP.
Meanwhile, Thunderwave is another AoE Spell that deals 2-16 Thunder Damage, which pushes targets 2 cells away from where you’re standing. Be careful when casting this Spell if your party members are beside the targets, otherwise, you can hit and damage them by mistake.
Fighter Level 4 Ability Score Choice and Spells
At Level 4, you’re given two options to further enhance your character. First is with the Ability Score Choice, which allows you to allocate two points on an Ability or one point each to 2 Abilities. Second is with the Bonus Feat, which is part of a set of special Abilities available to almost all of the Classes. You’ll need to fulfill certain requirements before selecting a specific Feat. Some have a caution symbol beside them to warn you that that Feat is not recommended as you are already reaping some, if not all, of its benefits.
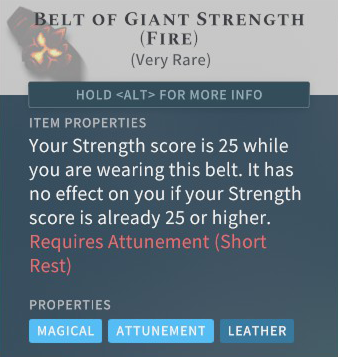
Since you’ll also get this option when you reach Levels 6 and 8, which is far better compared to the other Classes who only gain this bonus at Levels 4 and 8, you’ll need to prioritize the Ability Score Choice now. Because you’ll be wearing the Belt of Giant Strength (Fire) to boost Strength to 25, it’s best to focus on increasing Constitution to 18 in order to raise your max HP to 44, as well as boost your Saving Throws with this Ability by a further +1. Your improved Ability Score spread should look like this:
Furthermore, you can choose one more Level 1 Spell, which can either be Jump, Expeditious Retreat, or Thunderwave, depending on what you didn’t pick in the previous level.
Fighter Level 5 Extra Attack
At Level 5, you unlock Extra Attack, which allows you to use two Attack Actions per turn. The second attack is triggered after you make your first attack. Note that this is only applicable to Melee and Ranged Weapons. So for example, you have a Battleaxe equipped and you use it as your first Attack Action to hit an enemy. Because of this, you gain a second Attack Action to use your Battleaxe again. Extra Attack is also triggered when you use Shove.

You can activate Action Surge to gain an additional Main Action. You can then use another Attack Action to trigger one more Extra Attack. In total, you can attack enemies four times in a single turn with your Melee Weapon. Using your Spell will not trigger Extra Attack because this is considered as a “Cast Spell” Action instead of an Attack Action.
Fighter Level 6 Bonus Feat
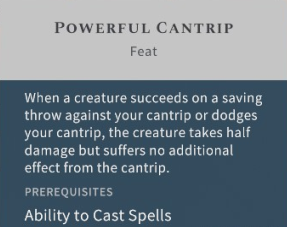
At Level 6, I suggest choosing the Powerful Cantrip Feat. Powerful Cantrip lets you deal half of the Cantrip’s damage even if the enemy manages to successfully Dodge or rolls a Saving Throw. It doesn’t however apply any additional affects if this triggers.
Fighter Level 7 Into the Fray and Spells
At Level 7, you gain Into the Fray. Into the Fray allows you to cast Spells with the Somatic Component without using your free hand as long as you use a Melee Weapon. Because of this, you no longer have to switch to your Secondary Equipment Set in order to cast Spells, and you can keep your Shield in your off-hand. Furthermore, when you’re near an enemy and you cast a Ranged Attack Spell, you won’t incur a Disadvantage making you much more versatile.
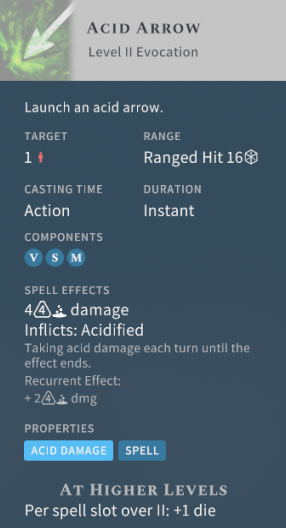
At this level, you also unlock Level 2 Spells but you can only choose one. I highly recommend Acid Arrow. Acid Arrow deals high Acid Damage and inflicts enemies with Acidified to take extra damage at every turn until it expires. This is a powerful Spell because you do two types of damage, namely burst damage and damage over time.
Fighter Level 8 Bonus Feat and Spells
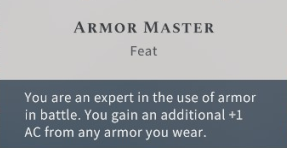
At Level 8, I highly suggest choosing Bonus Feat again. Since you’ve already maximized your damage in previous levels, you’ll have to further strengthen your defenses. Armor Master raises your AC by one even when you have Heavy Armor equipped, helping to prevent damage to you.
At this level, you can also learn one Spell. I recommend selecting Scorching Ray, which is similar to Magic Missile but it uses fire rays instead of projectiles. Scorching Ray inflicts massive Fire Damage against multiple enemies. Unlike Magic Missile however, this Spell can Miss.
Fighter Level 9 Indomitable
At Level 9, you gain access to Indomitable, which lets you reroll a Saving Throw should you fail the first time. This can only be used once per Long Rest, and is really good for this Build because you may really need to maintain Concentration and not want to have to spend a turn casting a Spell or Cantrip again when you could be attacking twice or more.
Fighter Level 10 Spell Tyrant and Spells
At Level 10, you unlock Spell Tyrant where you can move a creature out of range from the party when they unsuccessfully roll a Strength Saving Throw. You also get to choose a Cantrip and Spell to your liking.
Equipment
Weapons
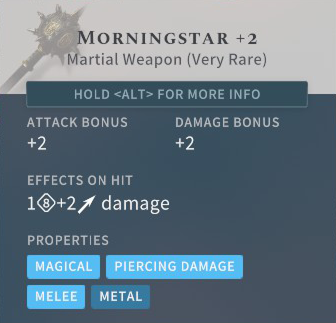
For your One-Handed Weapon, I recommend getting Morningstar +2. This Weapon allows you to deal high Piercing Damage with bonuses to both Melee Attack and Damage. As such, you’re more likely to hit and damage enemies at close range.
For your Offhand, Shield +2 gives you +4 AC, which in combination with your Heavy Armor, will make enemy attacks Miss you nearly 100% of the time.
Armor
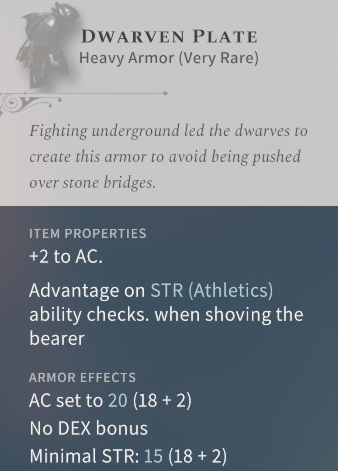
In terms of Armor, you can purchase the Dwarven Plate Heavy Armor from Joriel Foxeye of the Circle of Danantar Faction. The Dwarven Plate sets your base AC to 20. Between this and your Shield you’ll be extremely tanky, and hard to kill.
When it comes to Accessories, I highly recommend obtaining the Headband of Intellect so that your Intelligence Score increases to 19, which raises its corresponding modifier to +4. As a result, you’re nearly always able to hit enemies with Ranged Spells. Note that this Headband requires Attunement, which is limited to a total of three pieces of Equipment per character. You can only attune one piece of gear per Short Rest.
Next, to boost your Strength to 25, you’ll need the Belt of Giant Strength (Fire), which you can purchase from Halman Summer of the Antiquarian Faction. In order to buy this gear, you have to attain the Living Legend relationship with them, and you can do this by redeeming artifacts. With this Belt you’ll be able to hit enemies with your Melee Weapon 100% of the time and you can inflict the maximum Melee Damage possible. Note that this Belt also requires Attunement.
Final Tips
As a Spellblade Fighter, you need to be mindful of Spells like Ray of Frost that are considered Ranged Attacks, meaning they gain Advantage when you are elevated above the target. While not always possible, consider using this when you know you can gain this Advantage.
Conversely, if an enemy is at a higher vantage point than you, and there is no way of reaching them regardless of your Movement, you’ll want to use Magic Missile because this Spell cannot Miss. You also don’t gain Disadvantage and your enemy will still receive the same amount of Force Damage regardless of your position.
I highly recommend crafting a lot of Scrolls of Magic Missile at earlier levels so you can preserve your Spell Slots for more important Spells. You can also initiate Surprise Attacks with it to have one full round to your party without enemies attacking you.
Lastly, Action Surge doesn’t allow you to use Spells twice in one turn. Because of this, if you trigger this Feature after casting a Spell in order to kill an enemy, make sure that you’re ready to attack with a Cantrip or Melee Weapon depending on your position.
Stay tuned for more Solasta Crown of the Magister content as we take a look at Classes and Builds, and be sure to drop by our Twitch channel if you have questions about the game. If you need something specific, check out our Solasta Wiki.
Fextralife
Source link
Related Post:
- Solasta Sorcerer Build Guide | Mana Painter Class Guide
- Street Fighter 5’s final DLC fighter Luke teases Street Fighter 6
- Solasta Rogue Build Guide – Shadowcaster
- Solasta Wizard Build Guide – Shock Arcanist
- Solasta Ranger Build Guide – Hunter
- Solasta Paladin Build Guide – Oath of the Motherland
- Solasta Cleric Build Guide – Battle Domain
- Every New Fighter Coming To Guilty Gear, Street Fighter V, And More This Week
- Outriders Trickster Build Guide | Best Trickster Build Outriders
- Solasta Crown of the Magister Beginner’s Guide: 10 Tips You Should Know Before You Play