In this Solasta Crown of the Magister Cleric Guide I’m going to discuss my Cleric Build, and show you what works in terms of choosing the best Ancestry or Race, Background, Abilities and a lot more. If you’ve been looking for a way to play as a Cleric who can deal massive damage with Melee Weapons and Spells while buffing the party, then this Guide is for you.
Solasta Crown of the Magister Cleric Build Guide: Battle Domain
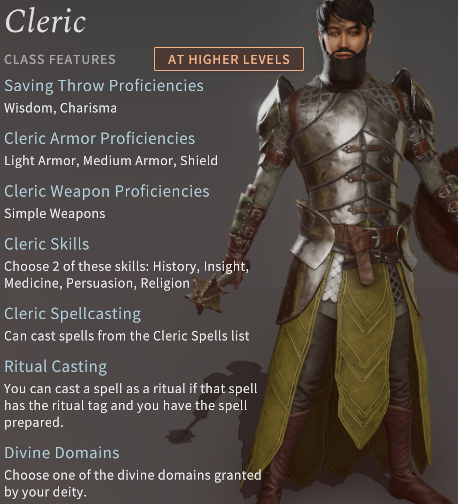
Clerics are conduits of their Deity’s power. As such, they wield divine magic that they can only harness through devotion. They combine healing and offensive magic to support their allies in the face of danger. Clerics have Proficiency with Simple Weapons as well as Light and Medium Armor, which are enough to protect them in Combat.
Battle Clerics are proficient with Martial Weapons, giving you access to better Equipment. You’ll focus on Wisdom, which is your Spellcasting Ability, and Strength. These Abilities allow you to cast Spells that will land on enemies and to effectively hit and to damage them with Melee Weapons.
Cleric Character Creation
In this section, we’ll discuss the best Cleric’s Ancestry, Background, Abilities, Skills, and Language to choose in Character Creation.
Ancestry
Out of all the races, Humans make the best Cleric because they receive +1 bonuses to all Abilities. The additional +1 Wisdom, Strength and Constitution benefit this Class greatly. With Constitution, their max HP and therefore their durability, are improved.

Compared to the Hill Dwarf, which provides you with +2 Constitution, +1 Wisdom, and incremental HP increase per level, Humans are still better because of their well-balanced Ability Score spread at earlier levels, and greater movement.
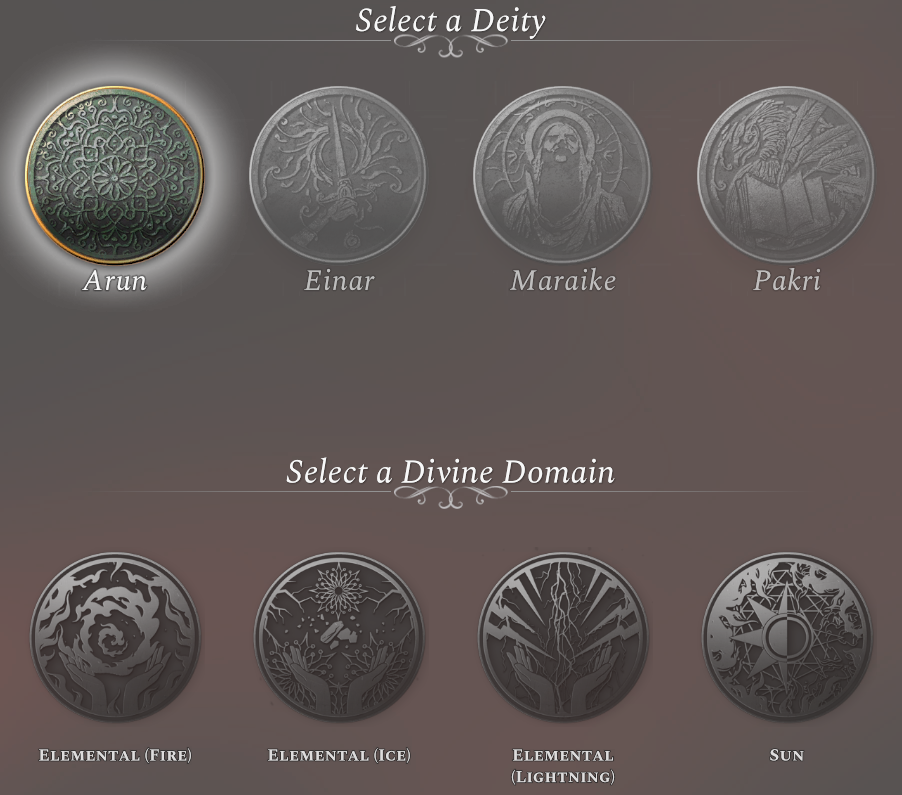
Deities and Divine Domains
Unlike Paladins, choosing a Deity largely impacts your Build because they are tied to the Cleric’s different Divine Domains or Subclasses. There are four Deities and ten Divine Domains in total. Let’s go through them one by one.
Arun
Elemental (Fire), Elemental (Ice), Elemental (Lightning)
These Elemental Divine Domains provide you with Elemental Domain Spells that are both offensive and defensive in nature. They also gain resistance to Fire, Ice or Lightning Damage, as well as a Bonus Cantrip depending on the element. Although their Bonus Cantrips are useful, the resistances they offer are not since the majority of enemies don’t often inflict these types of damage.
Sun
The Sun Divine Domain has more offensive Fire and Light Spells. This Subclass relies on using Sacred Flame given that this Spell also imposes a Disadvantage on the target’s Saving Throw, thereby increasing the chances of harming them.
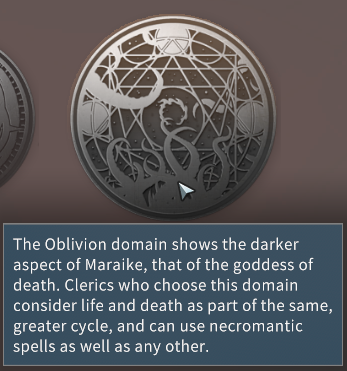
Maraike
Life
Life is the ultimate tank Cleric because they cast Spells that buff, heal and revive the party such as Bless, Cure Wounds, and Revivify, respectively. Since the Life Cleric’s forte is being on the defensive, they can also equip Heavy Armor, which considerably boosts their durability.
Oblivion
Unlike Life, Oblivion focuses on dealing offensive Spells executed at close range. This makes it a staple choice for Melee Builds. Additionally, Oblivion Clerics as well as their allies, take Advantage on Death Saving Throws, which significantly raises the chances of surviving in combat.
Pakri
Law
Law is similar to the classic Paladin in that they have Spells to support and to defend the party. Furthermore, they gain Proficiency in Intimidation and Advantage on Intimidation Checks, which go hand in hand with high Charisma. Law Clerics are also more resistant to being Shoved.
Insight
Insight comprises Spells that require decent Intelligence and Charisma, which aren’t the Cleric’s main Abilities, in order to successfully roll Arcana, History, Persuasion, or Intimidation Checks. However, what’s good is they have access to the Ritual Spell Identify, which is most useful if they don’t have a Wizard in their party. Ritual Spells can be cast outside of combat to discover the hidden properties of an object. This prevents them from spending gold for an NPC to identify magical objects. The rest of their Spells are aimed at destabilizing enemies.
Einar
Law
Einar’s Law Domain is similar to Pakri’s. The only difference is that Einar’s Alignment is Lawful Good whereas Pakri is Lawful Neutral.
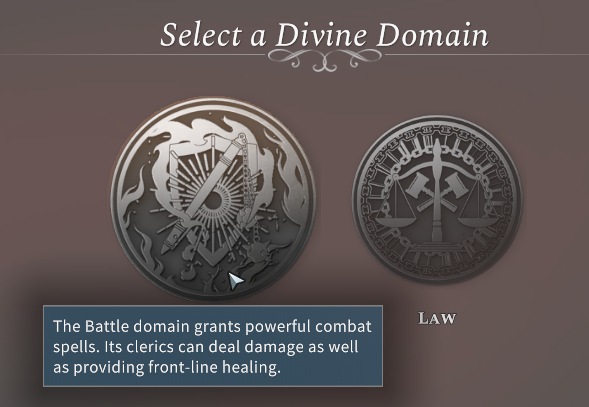
Battle
This brings us to our chosen Divine Domain, which is Battle. The Subclass has a lot of destructive Spells such as Magic Missile, Acid Arrow, and Fireball on top of their buffs. With Divine Fortitude, you gain temporary HP every time you level up. Additionally, you have access to the Battle Magic Feature. Battle Magic is relevant to the Melee-based Cleric because you can now cast Spells that have the Somatic Component without switching to your Secondary Equipment Set in order to activate them with your free hand. Consequently, Battle Clerics make for excellent frontliners in combat.
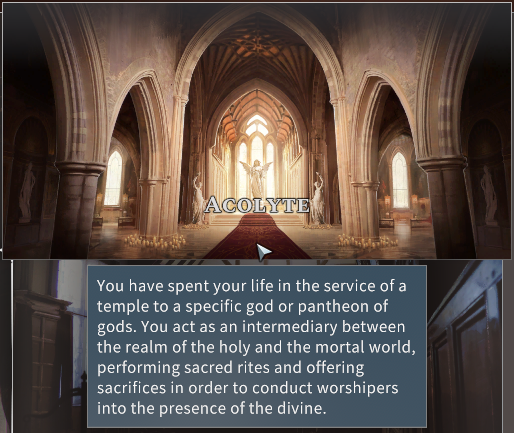
Background
For the Background, I recommend choosing Acolyte. As an Acolyte, you gain additional proficiency in Religion, Nature and Insight. The latter two are more essential due to your high Wisdom. Furthermore, you also become an expert in Creating Potions thanks to your Herbalism Kit Proficiency.
Abilities
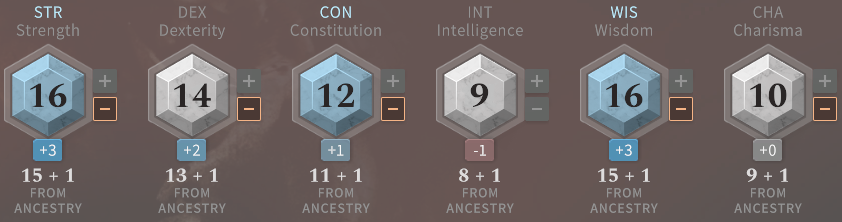
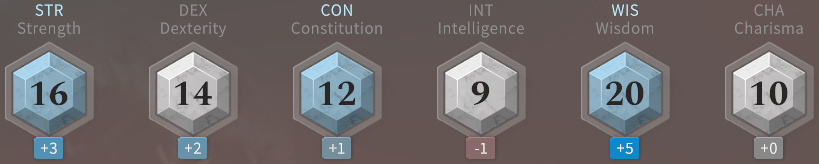
In this guide, I’ll make use of the Point Buy Ability Generation System instead of Dice Rolls so I can control the points I allot for each Ability. The Cleric’s Spellcasting Ability is Wisdom, which determines whether or not the Spells they cast will successfully land on enemies. You can increase this Ability to 16 so you immediately reap the benefit at earlier levels. As such, you’ll receive +3 Spellcasting Ability Modifier to improve your hit chances.
The second most important Ability is Strength. For your Melee Cleric, you’ll want to increase your chances of successfully hitting and damaging enemies with Melee Weapons and you can achieve this by raising Strength to 16. You’ll also be able to jump farther and to carry more items in your inventory. Later on, you’ll be equipping the Belt of Giant Strength (Fire) to maximize this Ability to 25, providing you with a great +7 Strength Modifier.
Third is Dexterity, which you have to increase to 14 to take advantage of the +2 Dexterity Modifier. This is added to your Medium Armor and Armor Class (AC). Next is Constitution that you can raise to 12 to start with 9 HP. It shouldn’t be a problem since you’ll be equipping the Amulet of Health in order to boost Constitution to 19.
You can then distribute the remaining points between Charisma and Intelligence. With Point Buy, your Ability Score spread should look like this:
Skills
For Skills, I suggest choosing Medicine. Medicine allows you to craft healing Potions at a quicker rate. This is beneficial given the limited number of Spell Slots you have at lower levels. You can then select any Skill that suits your other Abilities.

Language
You can choose any language you want.
Cleric Level 1 Features, Cantrips and Spells
Battle Magic and Divine Fortitude
As mentioned earlier with Battle Magic, you can now cast Spells with the Somatic Component even when you’re wielding a Weapon and Shield. You also gain 3 temporary HP per level thanks to the Divine Fortitude Feature.
Scroll Scribing
Clerics are able to learn more Spells by “Scribing” these from Scrolls provided that said Spells are part of the Cleric Spell List. However, I prefer having the Wizard do the scribing since their Wizard Spell List is broader. Moreover, they’re proficient in Arcana, which is useful in this activity.
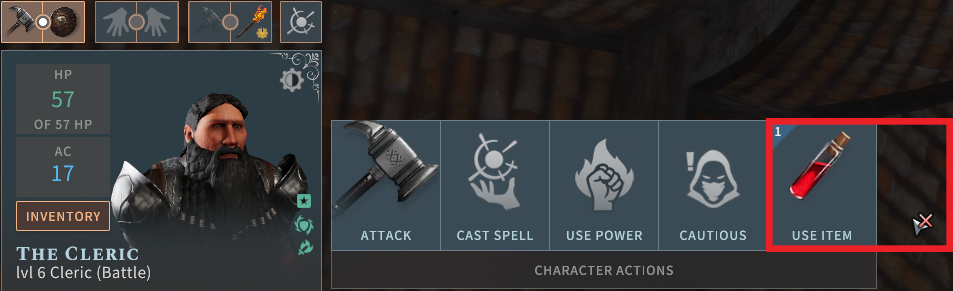
Ritual Casting
As previously discussed, Clerics also have access to Ritual Casting. Because of this, they have a dedicated “Ritual Button” so that they won’t expend their Spell Slots when they activate Ritual Spells. However, there’s a bug at the moment where this button, which ought to be beside “Use Item”, is not visible to the Battle Cleric even when you’ve prepared a Ritual Spell. Unlike other regular Spells, you don’t need to prepare this before you can use it.
Cantrips
Cantrips are cast without expending Spell Slots, which means that you can use them in every turn. At Level 1, you get to choose three Cantrips. Remember that the majority of encounters take place in unlit areas so you’ll need a stable light source to prevent incurring a Disadvantage. Disadvantage is a mechanic, which makes you roll a D20 twice for an Attack Roll, Ability Check, or Saving Throw. Of the two values that you get, having Disadvantage means you’ll be using the lower value between the two. In this instance, you’ll likely miss your hits since you cannot see enemies well in the dark.
I recommend the following Cantrips:
 Light allows you to illuminate your Weapon for 1 hour so you can fight properly in unlit areas. Since many combats are in darkness, this can be a tremendous boost to your damage, since you will land attacks much more often.
 Sacred Flame inflicts 1-8 Radiant Damage as long as the target fails their Dexterity Saving Throw. This can sometimes be powerful but oftentimes, the miss rate of this Cantrip is high because of decent Dexterity Scores.
 Spare the Dying lets you save a dying ally with 0 HP from continually performing Death Saving Throws, which can result in actual death when they fail. What happens is once you touch them, they’ll be stable but unconscious. You’ll need to heal the target separately to bring them back on their feet.
Prepared Spells
Prepared Spells are those that require “Preparation” in order to cast them. You can only perform this activity once after every Long Rest. Note that there are only a limited number, which increases when you reach certain levels. At Level 1, you can prepare four Spells. I suggest selecting the following:
 Bless increases your party members’ Attack Rolls and Saving Throws for several rounds. This raises the likelihood of hitting enemies and saving allies from attacks, respectively. It’s a good all around buff that can make combat go your way.
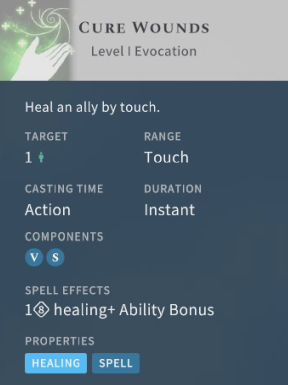
 Healing Word is Bonus Action that allows you to heal an ally. Compared to Cure Wounds, I prefer this Spell because you can heal them from afar. Your +3 Wisdom Modifier is also added to the target’s restored HP.
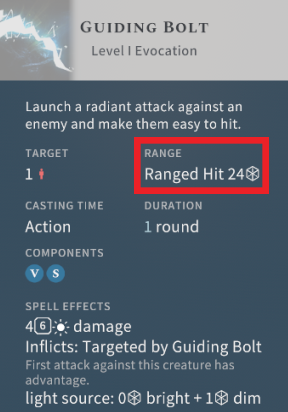
 Guiding Bolt is a very strong Spell that inflicts 4-24 Radiant Damage from afar. What’s good is this illuminates your target, making them highly visible to the rest of the party. Additionally, you can gain Advantage by being on higher ground.
 Inflict Wounds deals 3-30 Necrotic Damage up close. This one is particularly good here since you’re a Melee Cleric, and will often be in melee range.
Among these Prepared Spells, you’ll notice that Bless has the Concentration Property. Concentration is broken if you cast another Cantrip or Spell that also requires Concentration. For example, if Bless is active and you decide to cast Shield of Faith, then Shield of Faith will be the active Spell.

Moreover, when you take damage while a Cantrip or Spell that requires Concentration is active, you’ll need to make a Constitution Saving Throw and succeed to maintain its effect, otherwise you’ll have to recast it. This is where Constitution comes in handy in order to increase your Saving Throw’s success rate.
Domain Spells
Domain Spells are automatically available so it doesn’t count towards your total number of Prepared Spells. At Level 1, you’ll get the following:
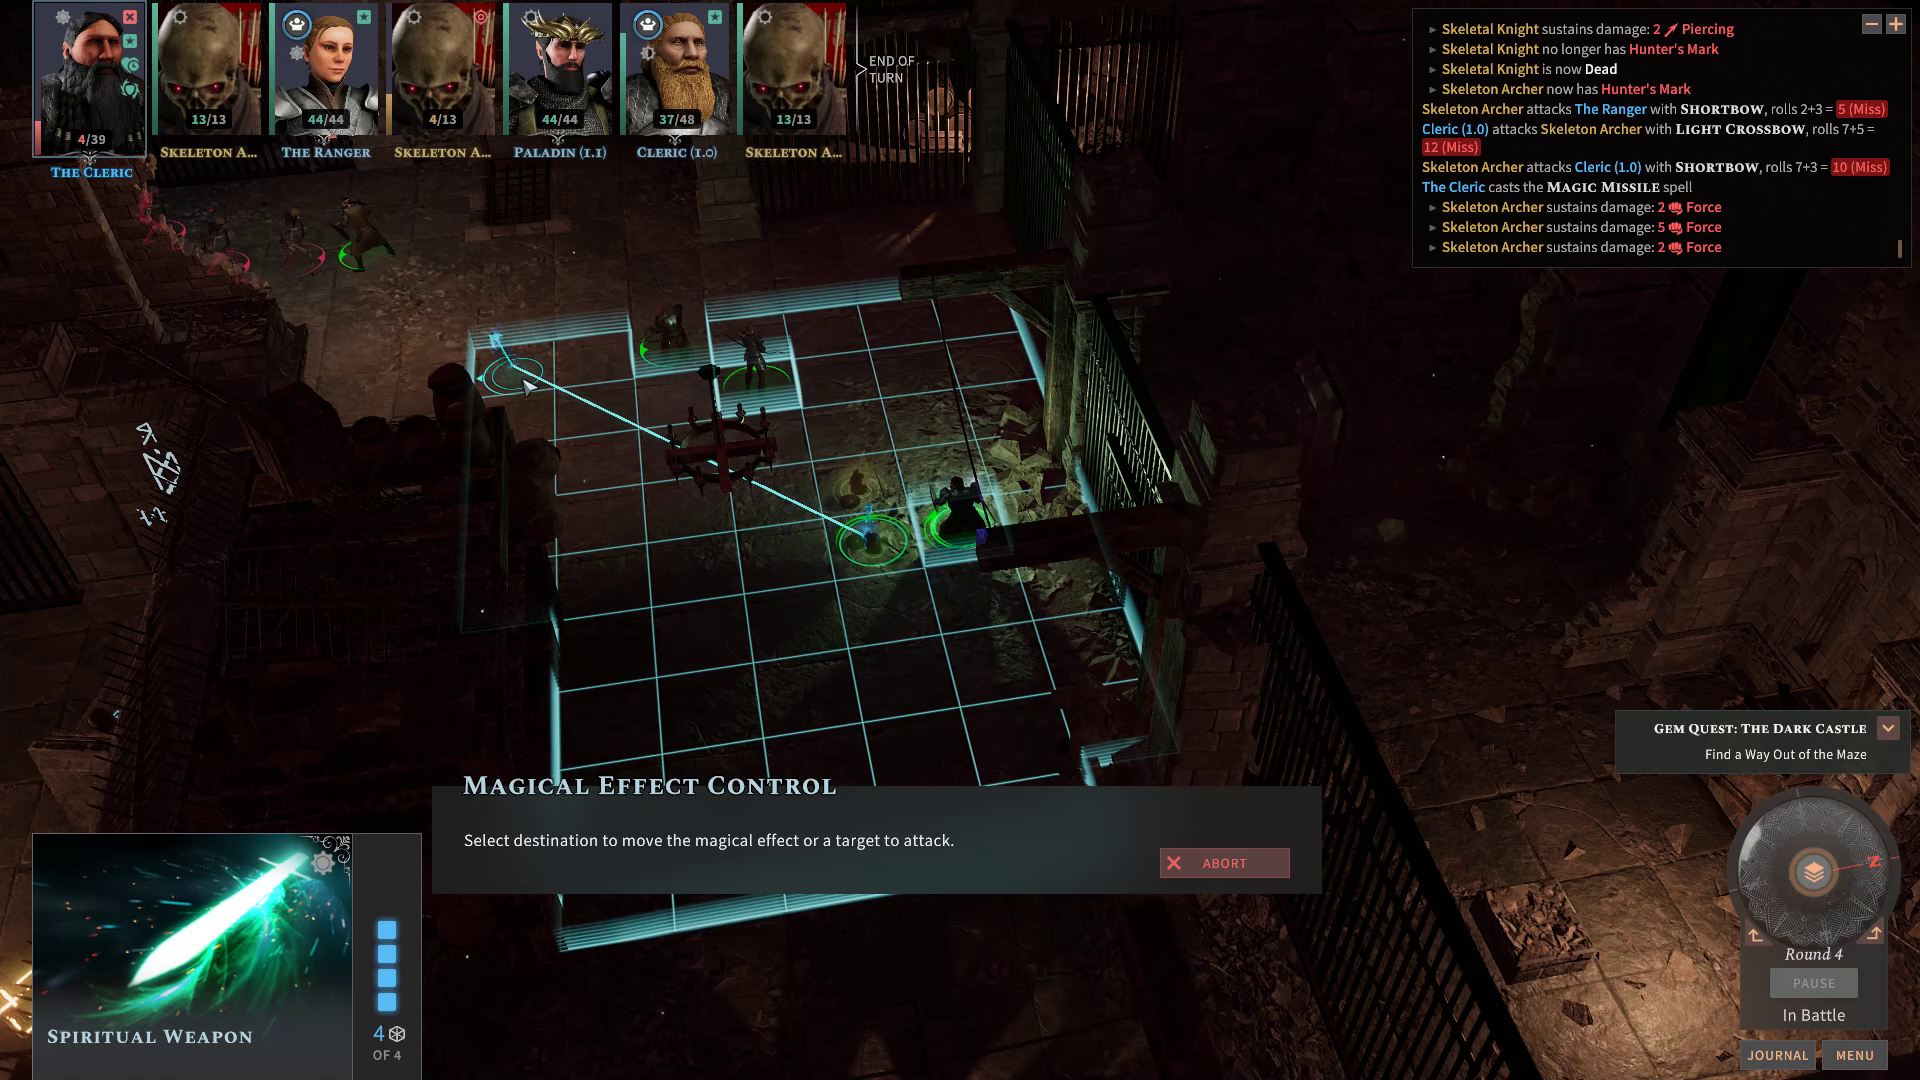
 Magic Missile deals 2-5 Force Damage with multiple projectiles. This Spell doesn’t miss, so it’s great for situations where you might otherwise have Disadvantage, like in dim light or lower ground with respect to the enemy.
 Shield of Faith raises your target’s AC by 2. This is advantageous in cases when their HP is already low so they need that extra layer of protection.
Cleric Level 2 Channel Divinity and Spell
Channel Divinity: Decisive Strike and Turn Undead
At Level 2, you’ll unlock Decisive Strike. Upon successfully hitting the enemy, you’ll get the option to deal additional 1-6 Bludgeoning Damage while stunning them in the process. Note that if they successfully roll a Constitution Saving Throw, the stun condition will be nullified. As such, this is better triggered when facing enemies with low HP, who will most likely fail their Saving Throw.
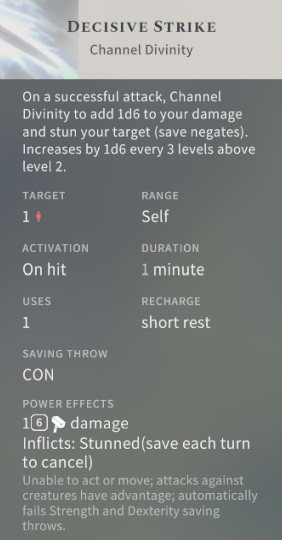
Additionally, you gain Turn Undead, which pushes the Undead to flee from you unless they successfully roll a Wisdom Saving Throw. Although this isn’t as useful at earlier levels, you can activate it in some cases when your HP becomes dangerously low and you’ve run out of Spell Slots to heal yourself. Both Channel Divinity Features are recharged after taking a Short Rest.
Spell
You can also prepare one more Spell. I suggest selecting Cure Wounds because this restores the HP of an ally by touching them. It also accounts for your +3 Wisdom Modifier.
Cleric Level 3 Spells
Prepared Spell
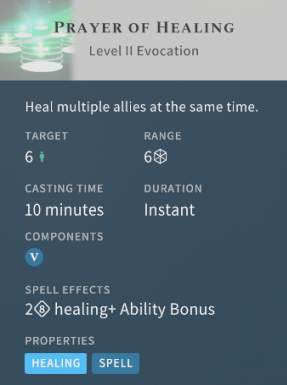
At Level 3, you’re able to prepare one Spell. You also gain access to Level 2 Spells. Because of this, I recommend choosing Spiritual Weapon and substituting Cure Wounds with Prayer of Healing. Spiritual Weapon lets you summon a magical Melee Weapon under your control to deal sufficient Bludgeoning Damage. As a result, you’re able to attack enemies twice in one turn.
Compared to Cure Wounds, Prayer of Healing is cast when you’re 6 cells away from your targets rather than touching them. What’s great with this Spell is you can simultaneously heal multiple allies and restore higher HP, which also considers your Wisdom Modifier.
Domain Spells
At this level, you unlock two destructive Domain Spells specifically the following:
 Acid Arrow deals massive 4-16 Acid Damage and inflicts targets with Acidified to take extra damage at every turn. This is a powerful Spell because you do two types of damage, namely burst damage and damage over time, both of which guarantee quick kills.
 Flaming Sphere allows you to summon a burning sphere to follow targets around and to inflict 2-12 Fire Damage. As long as this ball of energy is active and a target accidentally walks through it, they’ll take damage.
Cleric Level 4 Ability Score Choice and Cantrip
Ability Score Choice
At Level 4, you’re given two options to further enhance your character. First is with the Ability Score Choice, which allows you to allocate two points on an Ability or one point each to 2 Abilities. Second is with the Bonus Feat, which is part of a set of special Abilities available to almost all of the Classes. You’ll need to fulfill certain requirements before selecting a specific Feat. Some have a caution symbol beside them to warn you that that Feat is not recommended as you are already reaping some, if not all, of its benefits.
Between the Ability Score Choice and the Bonus Feat, I strongly advise picking the former. With this, you can boost Wisdom by 2 to raise its corresponding modifier to +4. As a result, you’ll be able to hit enemies with your Spells most of the time. You’ll again be given the option to choose between the Ability Score Choice and Bonus Feat when you reach Level 8.
Cantrip
You also get to choose a Cantrip you want.
Cleric Level 5 Turn Undead (Destroy) and Spells
Channel Divinity: Turn Undead (Destroy)
At Level 5, your Channel Divinity: Turn Undead is improved by adding the stipulation that lets you annihilate the Undead if they fail their Saving Throw Roll as long as their Challenge Rating is 0.5 or below.
Prepared Spells
From six Prepared Spells, you now have a total of nine and you also have access to Level 3 Spells. As such, I recommend the following:
 Detect Magic is a Ritual Spell that helps you determine magical items from your inventory. Once detected, you can either have your Wizard or an NPC cast Identify to reveal its hidden properties.
 Dispel Magic is a very effective Abjuration Spell because it removes any condition imposed on allies such as being Frightened or Charmed, as well as negating buffs of enemies like having extra AC. This Spell can be cast from afar and is intended to invalidate lasting magical effects rather than those that instantly damage or affect you. As such, Dispel Magic is not effective on an incoming Scorching Ray Spell.
 Revivify is a must-have Spell because it gives you the power to bring back a fallen ally. This can save you a complete party wipe, and a reload in many cases, so it’s best to have it.
Domain Spells
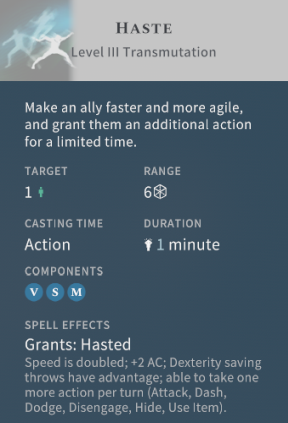
At this level, you unlock two powerful Domain Spells, namely Fireball and Haste. Fireball deals massive 8-48 AoE Fire Damage against multiple enemies. Even if they succeed in rolling Dexterity Saving Throws, they still receive half the Spell’s damage. Make sure that none of your allies are positioned in this Spell’s radius, otherwise, they’ll also get hit and damaged.

On the other hand, Haste lets you cast multiple buffs on a single ally. These include doubling their Movement Speed, adding +2 AC, having Advantage on Dexterity Saving Throws, and performing a second Action during their turn. This Action can be another attack, Dash or Dodge.
Cleric Level 6 Channel Divinity, Herald of Battle, and Spell
Channel Divinity
At Level 6, you gain one additional slot for your Channel Divinity powers.
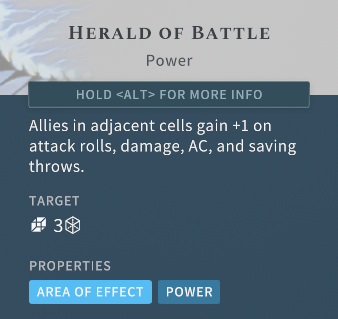
Herald of Battle
You also unlock Herald of Battle that further buffs all allies near you by providing them with +1 bonus to their Attack Rolls, damage, AC, and Saving Throws. Note that this is always active as long as you don’t become incapacitated.
Prepared Spell
At this level, you can add one Prepared Spell. Aid is a good Level 2 Healing Spell because you can heal three party members from a range of 6 cells.
Cleric Level 7 Spells
Prepared Spell
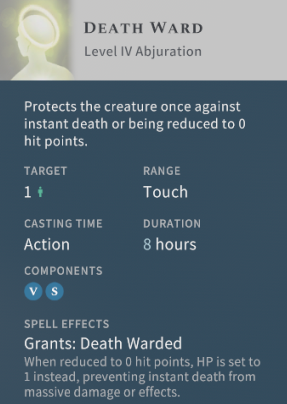
At Level 7, you unlock Level 4 Spells. Because of this, I recommend getting Death Ward, which is a powerful Abjuration Spell that prevents a weak ally from succumbing to 0 HP and rolling Death Saving Throws. When they reach 0 HP, they automatically become stable by gaining back 1 HP.
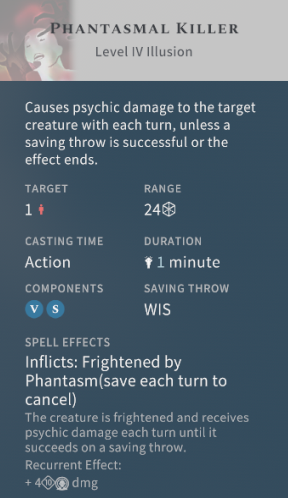
Domain Spells
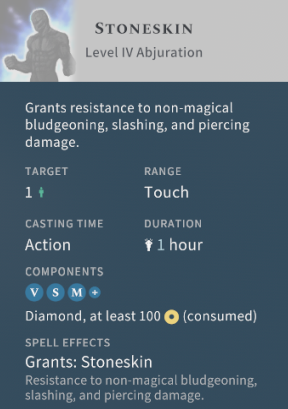
You also unlock two more Domain Spells, specifically Phantasmal Killer and Stoneskin. Phantasmal Killer frightens the enemy while inflicting 4-40 Psychic Damage over time. As long as they fail their Wisdom Saving Throws in each turn, they’ll continually get damaged heavily.
Meanwhile, Stoneskin makes an ally resistant to Physical Damage including Bludgeoning, Piercing and Slashing Damage. If for instance the enemy’s attack successfully connects and this ally receives 25 Bludgeoning Damage, they’ll instead take only half of it, which is equivalent to 13 damage, rounded up.
Cleric Level 8 Ability Score Choice and Features
Ability Score Choice
At Level 8, I recommend choosing Ability Score Choice over Bonus Feat. With this, you’ll be able to max out your Wisdom in order to further increase the chances of landing your Spells. Your improved Ability Score spread should look like this:
Channel Divinity: Turn Undead (Destroy)
Instead of killing the Undead if their Challenge Rating is 0.5 or below as in Level 5, you can now destroy them when their rating is at most 1.
Scholar of Battle
Scholar of Battle functions similarly as Extra Attack in that you can attack a second time in one turn using your Attack Action or Shove. These Actions are only applicable when using Melee and Ranged Weapons. If for instance you pierce an enemy with a Morningstar as your first Attack Action, you’ll trigger a second Action with the same Weapon. Note that casting a Spell will not initiate Scholar of Battle because this is considered a “Cast Spell” Action instead of an Attack Action.
Cleric Level 9 Spells
Prepared Spells
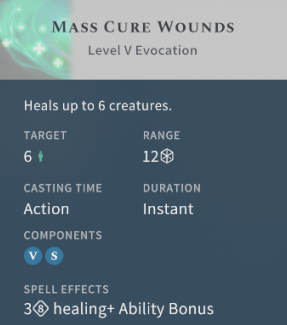
At Level 9, you unlock Level 5 Spells and you get to prepare a total of fourteen Spells. I highly recommend obtaining Mass Cure Wounds because it heals up to 6 creatures from afar. Note that this has the highest restoration possible.
You can then prepare Spells to your liking.
Domain Spells
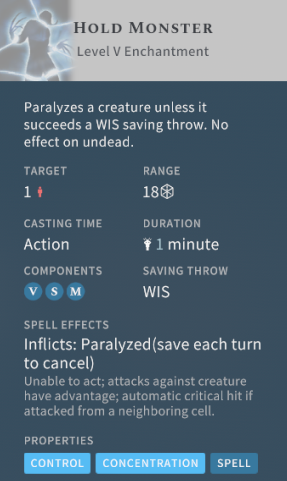
Moreover, you gain the last set of Battle Domain Spells, particularly Hold Monster and Insect Plague. Hold Monster paralyzes the enemy, except the Undead, until they succeed in rolling a Wisdom Saving Throw. While they’re paralyzed, you gain Advantage on your Attack Rolls.
On the other hand, Insect Plague lets you summon a sphere of insects, which causes 4-40 Piercing Damage. Additionally, enemies within the same area become blind due to the swarm.
Cleric Level 10 Divine Intervention, Spell and Cantrip
Divine Intervention
At Level 10 with Divine Intervention, you can summon your Deity in highly precarious situations when all allies are incredibly weak. If you manage to roll a number equal to 10, which is your current level, or lower, you’ll succeed. The success rate is incredibly low since you’re asking for a god to intervene in your life or death situation. Once summoned, you can then perform another Action that you want or need.
Prepared Spell and Cantrip
Additionally, you can choose another Spell and Cantrip that you like.
Equipment
Weapons
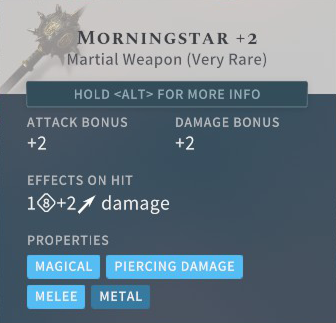
For your One-Handed Weapon, since you’re proficient with Martial Weapons, I highly suggest equipping Morningstar +2. This Melee Weapon inflicts massive Piercing Damage because of the +2 Attack and Damage Bonuses it provides. As such, you’re able to effectively hit and damage enemies up close.
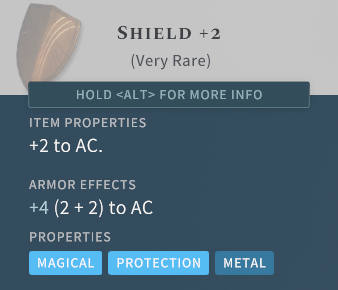
For your Offhand, Shield +2 provides you with additional +4 AC, which significantly boosts the chances of enemies missing their attacks.
Armor
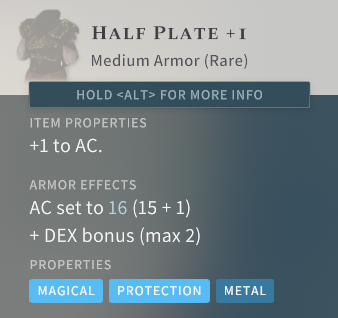
In terms of Armor, I recommend obtaining the Half Plate +1. This raises your AC to 18 because it takes into consideration your +2 Dexterity Modifier. With Shield +2, your total AC becomes 22.
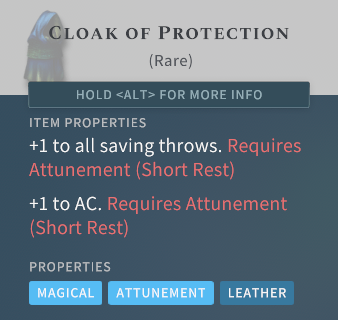
With other Accessories, the Belt of Giant Strength (Fire), Cloak of Protection, and Amulet of Health are great to have. These all require Attunement, which is limited to a total of three pieces of gear per character. You can only attune one piece of gear per Short or Long Rest. The Belt of Giant Strength (Fire) can be purchased from Halman Summer of the Antiquarian Faction. In order to unlock it, you’ll have to attain the Living Legend Reputation by giving them the majority of artifacts you collect. This Belt significantly increases your Strength to 25, which is equivalent to +7 Strength Modifier so you can hit enemies 100% of the time while inflicting the highest damage possible.

Cloak of Protection provides you with +1 bonus each to your Saving Throws and AC. As such, your total AC becomes 23, which guarantees that the attacks of enemies against you will often miss.
Lastly, the Amulet of Health raises your Constitution to 19, thereby boosting your max HP and ensuring that you successfully roll Constitution Saving Throws to maintain Concentration for your Spells.
Final Tips
As a Battle Cleric, you’re not limited to the Melee Build. If you wish to switch to the Ranged Build, which also deals good damage, you can instead invest 16 points in Dexterity rather than Strength. When it comes to your Weapon, change Morningstar +2 to Longbow +1, which can be purchased from Joriel Foxeye of the Circle of Danantar in Caer Cyflen. This shouldn’t be an issue since you’re already proficient with Martial Weapons anyway by choosing the Battle Divine Domain.
Make sure to cast Guiding Bolt from a higher elevation with respect to your targets when possible so you gain Advantage when you cast it. Together with other similar Spells, Guiding Bolt is considered a Ranged Attack as indicated in its Range Description.
Lastly, remember to pre-cast Light on your Weapon prior to initiating combat so you won’t incur a Disadvantage when facing enemies in the dark.
Stay tuned for more Solasta Crown of the Magister content as we take a look at Classes and Builds, and be sure to drop by our Twitch channel if you have questions about the game. If you need something specific, check out our Solasta Wiki.
Fextralife
Source link
Related Post:
- Solasta Sorcerer Build Guide | Mana Painter Class Guide
- Solasta Rogue Build Guide – Shadowcaster
- Solasta Fighter Build Guide – (Spellblade)
- Solasta Wizard Build Guide – Shock Arcanist
- Solasta Ranger Build Guide – Hunter
- Solasta Paladin Build Guide – Oath of the Motherland
- Outriders Trickster Build Guide | Best Trickster Build Outriders
- What Made BINARY DOMAIN One HELL of A Game?
- Solasta Crown of the Magister Beginner’s Guide: 10 Tips You Should Know Before You Play
- Fortnite Season 7 Battle Stars | How to redeem all Battle Pass content