In this Solasta Crown of the Magister Wizard Guide I’m going to discuss my Shock Arcanist Wizard Build, and show you what works in terms of choosing the best Ancestry or Race, Background, Abilities and a lot more. If you’ve been looking for a way to play as a Wizard who’s very precise when it comes to effectively casting Spells, then this Guide is for you.
Solasta Wizard Build Guide: – Shock Arcanist
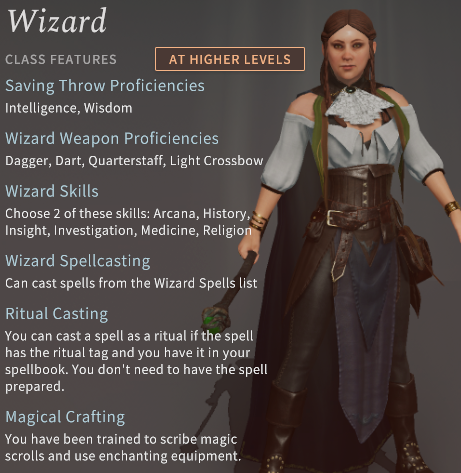
Wizards wield the power of magic by Crafting Scrolls and casting Spells to deal massive amounts of damage. In order to effectively harness the Arcane Arts, Wizards are fully dependent on their Intelligence, which determines whether or not the Spells they cast actually land on their targets. They can also learn more Spells by “Scribing” these from Scrolls provided that said Spells are part of the Wizard Spell List.
However, in order to cast it, they’ll have to “Prepare” these Spells beforehand. Despite their high damage potential, they are very fragile and therefore prone to dying, probably more so than other Classes due to their relatively low HP and Armor Class (AC).
As a Shock Arcanist Wizard, your most defining Features are Arcane Warfare and Arcane Fury. Arcane Warfare lets you cast offensive Spells one level higher than its current level, while Arcane Fury adds your Proficiency Bonus and Intelligence Modifier to your Evocation Spell’s damage. Therefore, the damage you inflict is higher than would be typical of other Wizards.
Wizard Character Creation
In this section, we’ll discuss the best Wizard’s Ancestry, Background, Abilities, Skills, and Language to choose in Character Creation.
Ancestry
When it comes to Ancestry or Race, Humans make for excellent Wizards. As a Human, you get +1 bonuses for all Abilities, which largely benefits your Intelligence and Constitution. High Elf would typically not be a bad choice either, but we are going to be wearing Medium Armor, so do not need high Dexterity.

Background
For the Background, I recommend choosing Sellsword. This choice may seem counterintuitive given its Soldiering Feature, which makes Wizards proficient in Athletics and Intimidation.
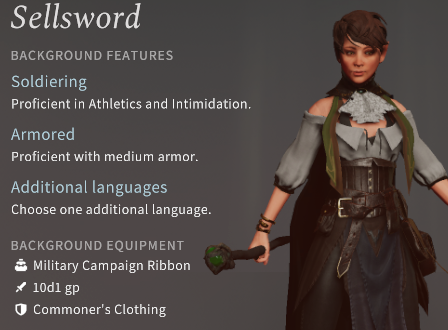
Athletics isn’t too useful to a Wizard since they can opt to use the Misty Step Spell to teleport themselves from an area filled with enemies to a safer location. Intimidation also isn’t something they would normally engage in. However, the main benefit of the Sellsword is you gain Proficiency with wearing Medium Armor. As mentioned earlier, Wizards are fragile and this is in part due to their low AC. A higher AC provides sufficient protection to this Class, which is by default only proficient with Clothing.
Abilities
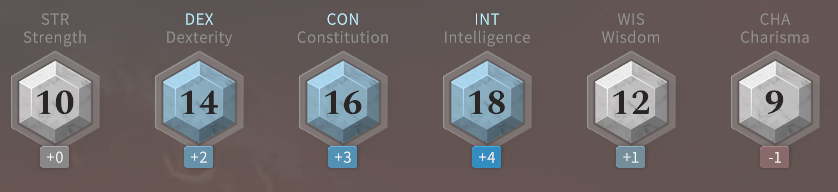
In this guide, I’ll make use of the Point Buy Ability Generation System instead of Dice Rolls so I can control the points I allot for each Ability. The Wizard’s Spellcasting Ability is Intelligence. As previously mentioned, it increases your chances of hitting enemies with the Spells you cast. You can increase this Ability to 16 so you immediately reap the benefit at earlier levels. You’ll then get +3 Spellcasting Ability Modifier to increase your hit chances.
The next essential Ability is Constitution. You’ll also want to raise this to 16 so you can start with 9 HP, and CON helps with Saving Throws when you are Concentrating on some spells. Lastly is Dexterity. Since you’re going to equip Medium Armor, you want to raise Dexterity to 14 and no higher because this Armor type limits the Dexterity Modifier added to your AC to +2, which means higher DEX will be wasted in terms of AC. Scale Mail Armor works fine at the start but you’ll want to upgrade this later on.
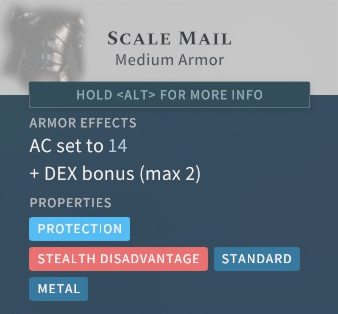
With the Scale Mail Armor your AC becomes 16. At lower levels, you should be able to protect yourself from easy enemies like Bandits and Badlands Spiders. It’s also good to raise Strength to at least 10 considering that you’ll equip Medium Armor, which weighs more than Clothing. Having a higher carrying capacity also prevents you from being Encumbered, which reduces your Speed by 2. The rest of your points can then be distributed to Wisdom and Charisma.
Your Ability Score spread should look like this with Point Buy:

Skills
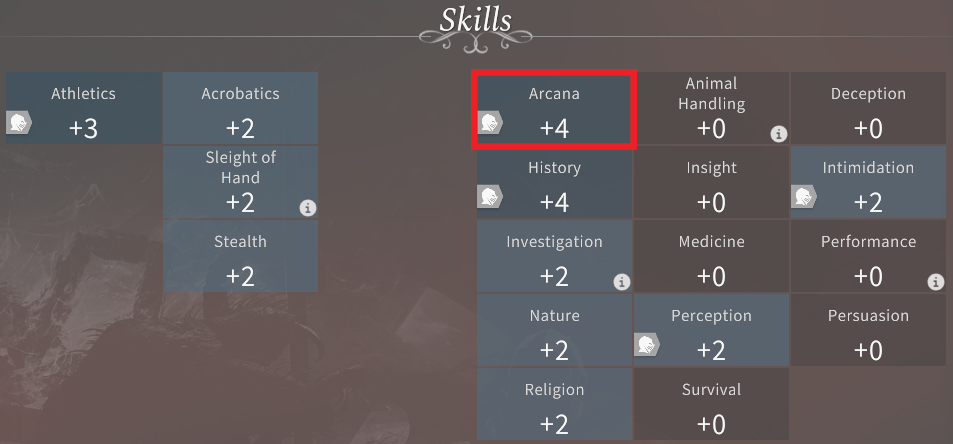
For Skills, I recommend choosing at least one that is Intelligence-based. I highly suggest selecting Arcana, which allows you to recall lore about Spells, magical items, and traditions when you’re searching for clues in quests. This also comes in handy when you craft Scrolls in order to preserve Spell Slots for more important Spells. For the other Skill, you can opt to pick History, Religion, or Investigation. Note that Wisdom-based Skills like Insight and Medicine won’t matter much to you if your Wisdom Score is low.
Language
You can choose any Language you want.
Wizard Level 1 Cantrips, Spells, and Concentration
Cantrips
Wizards use Cantrips and Spells to deal magical damage. Cantrips are cast without expending any Spell Slot, which means that you can use them every turn if you wish. At Level 1, you can choose three Cantrips.
Since combat encounters often occur in the dark, you’ll need a stable source of light to prevent Disadvantage. Disadvantage is a mechanic, which makes you roll a D20 or 20-sided die twice for an Attack Roll, Ability Check, or Saving Throw. Of the two values that you get, having Disadvantage means you’ll be using the lower value between the two. In this instance, it would be more difficult for your attacks to hit enemies because you cannot see them well in the dark.
I recommend the following Cantrips:
 Dancing Lights summons a wisp of light that you can control for 1 minute. This is essential in combat because it produces a stable light source. To cast Dancing Lights, you need to equip a Component Pouch because of its Material Component.
 Chill Touch deals 1-8 Necrotic Damage and inflicts a target with Chilled, thereby preventing them from healing themselves. This is very useful against the Undead, which you’ll encounter a lot of. With this Cantrip, they’ll also gain a Disadvantage every time they attack you.
 Shocking Grasp deals 1-8 Lightning Damage and inflicts Shocked to prevent a target from using Reactions like Attack of Opportunity and Shield. Reactions are offensive or defensive responses against attacks. You can cast this when you’re beside the target.
Spells
Spells, with the exception of Ritual Spells, need to be “Prepared”, otherwise, you won’t be able to use them in combat. In Solasta, you can only prepare Spells once after every Long Rest. At Character Creation, you get to choose six Level 1 Spells. I recommend the following as these will either deal the highest damage possible or protect you by increasing your AC:
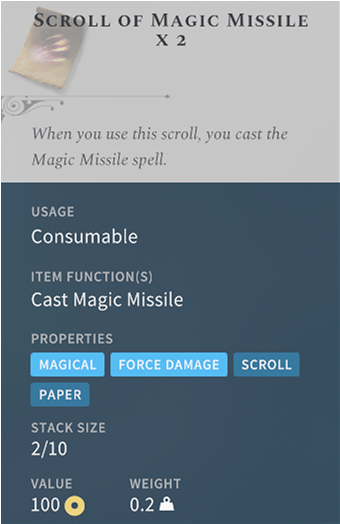
 Magic Missile deals 2-5 Force Damage using multiple projectiles against targets. This Spell doesn’t miss, so is great for situations where you might otherwise have Disadvantage, like in low lightning.
 Shield is a Reaction that increases your AC by 5 prior to getting hit and it makes you immune to Magic Missile. This pumps your defense very high, and can prevent nearly all damage.
 Thunderwave is an AoE Spell that deals 2-16 Thunder Damage and pushes targets 2 cells away from you. For this Spell to hit, targets will have to fail their Constitution Saving Throws. You have to make sure that your party members are not near the targets, otherwise, they can be hit and damaged by this Spell.
 Burning Hands is an AoE Spell that deals 3-18 conal Fire Damage. Similar to Thunderwave, you have to position party members away from your targets, otherwise, they can get damaged by this Spell. Moreover, for this Spell to hit, targets will have to fail their Dexterity Saving Throws.
 Color Spray inflicts multiple targets with Blindness for 1 round. Because of this, targets will gain Disadvantage every time they attack while you gain Advantage when you attack them.
Concentration
There are also Cantrips and Spells whose effects are dependent on the Wizard’s Concentration to remain active. Concentration is broken if you cast another Cantrip or Spell that also requires Concentration. For example, if Dancing Lights is active and you decide to cast Expeditious Retreat, then Expeditious Retreat will be the active Spell. Moreover, when you take damage while a Cantrip or Spell that requires Concentration is active, you’ll need to make a Constitution Saving Throw and succeed to maintain its effect, otherwise you’ll have to recast it. This is where a high Constitution comes in handy in order to increase your Saving Throw’s success rate.
Wizard Level 2 Arcane Traditions and Arcane Recovery
At Level 2, you’ll choose your Subclass from a selection of Arcane Traditions. Among the Shock Arcanist, Loremaster and Greenmage, Shock Arcanist is easily the best damage-dealing build for a Wizard. The Loremaster simply provides you Advantage on Arcana, History and Investigation Ability Checks while improving your Crafting time without providing any bonuses in combat. On the other hand, the Greenmage focuses on Green Magic, which are buffs to mark enemies in order to increase damage dealt and to improve your resistances from the effects of certain Spells. You’re also able to restrain enemies with vines to confine them in one area. But despite these perks, the raw damage potential of Shock Arcanists is still higher.

With the Shock Arcanist Wizard, you gain Arcane Warfare that allows you to cast Spells one slot level higher than its current level. This Feature significantly raises the damage you deal and is only available to the War List, which includes Magic Missile, Thunderwave, Burning Hands, Acid Arrow, Scorching Ray, Fireball, Lightning Bolt, and Flaming Sphere.
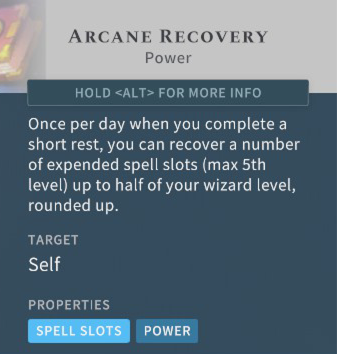
Regardless of the Subclass you pick, you’ll also gain Arcane Recovery. This allows you to replenish some of your expended Spell Slots when you take a Short Rest once per day. The number of recovered Spell Slots is dependent on half of your current level, rounded up if necessary.
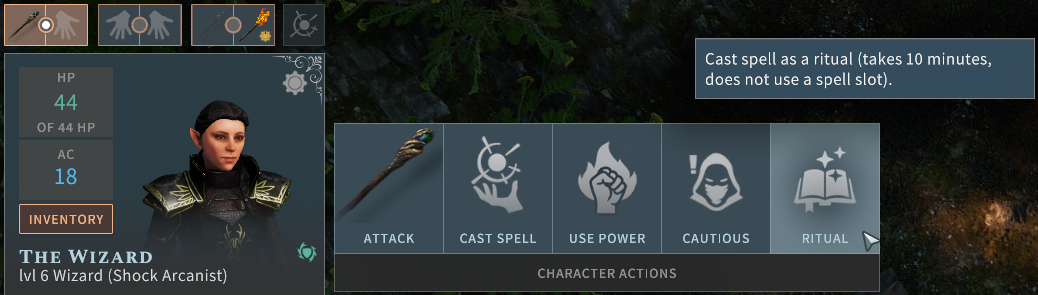
At this level, you also get two more Level 1 Spells to add to your list of Prepared Spells. For this I suggest taking Identify, which is a Ritual Spell that you can cast outside of combat to discover the hidden properties of an object. This will prevent you from spending gold for an NPC to identify magical objects for you. Remember to cast Identify using the “Ritual” button so that your Spell Slot will not be depleted. For the next Spell, you can pick any that suits your playstyle.
Wizard Level 3 Spells
At Level 3, you can choose two new Level 2 Spells such as Acid Arrow and Misty Step.
 Acid Arrow deals 4-16 Acid Damage and inflicts enemies with Acidified to take extra damage at every turn until the effect expires. This is a very powerful Spell because you can deal burst damage while inflicting damage over time.
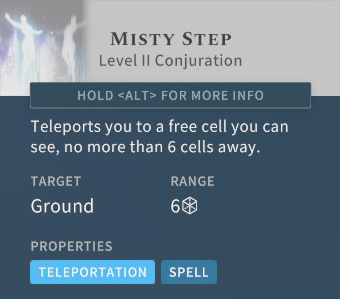
 Misty Step is a Bonus Action that allows you to teleport to an enemy-free area. This is useful especially when you don’t have the Scale Mail Armor yet so your AC isn’t that decent or if your HP is dangerously low. Note that the enemy will not be able to perform an Attack of Opportunity against you when you use this Spell.
Wizard Level 4 Ability Score Choice
At Level 4, you’re given two options to further enhance your character. First is with the Ability Score Choice, which allows you to allocate two points on an Ability or one point each to 2 Abilities. Second is with the Bonus Feat, which is part of a set of special Abilities available to almost all of the Classes. You’ll need to fulfill certain requirements before selecting a specific Feat. Some have a caution symbol beside them to warn you that that Feat is not recommended as you are already reaping some, if not all, of its benefits.
Between the Ability Score Choice and the Bonus Feat, I strongly advise picking the former. With this, you can boost your Intelligence by 2 points to raise its corresponding modifiers to +4. As a result, your Spells will most likely hit enemies. Your improved Ability Score spread should look like this:
You’ll again be given the option to choose between the Ability Score Choice and Bonus Feat when you reach Level 8.
At this level, you can also pick one Cantrip and two Level 2 Spells. For the Cantrip, I suggest choosing Ray of Frost deals 1-8 Cold Damage and inflicts Hindered, which reduces the target’s Speed by 2. Meanwhile for the Spells, I recommend picking Scorching Ray and Flaming Sphere.
 Sorching Ray is highly destructive because it can deal 2-12 Fire Damage to multiple enemies, or 3x 2-12 damage to the same target. This is a lot of damage, and it is very versatile.
 Flaming Sphere allows you to summon a burning sphere to follow enemies around and to damage them in the process. This has many useful applications, including adding another unit to the battlefield.
Both Spells will cause significant harm than described as these are part of the War List.
Wizard Level 5 Spells
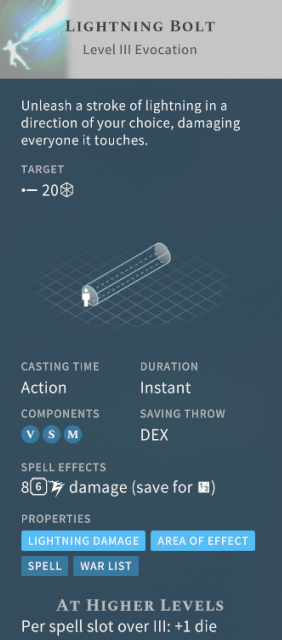
At Level 5, you unlock Level 3 Spells and you can select two more to add to your list of Prepared Spells. Fireball and Lightning Bolt are very effective AoE Spells that deal massive Fire and Lightning Damage versus enemies around or in front of you, respectively. Just make sure to cast either Spells when none of your party members are standing near the enemies, otherwise, you might accidentally kill them. These are also part of the War List so both will deal much more damage.
Wizard Level 6 Arcane Fury and Spells
At Level 6, you gain Arcane Fury to supplement the damage you deal with Evocation Spells. Your Proficiency Bonus and Intelligence Modifier will be added to your Spell’s damage output, which increases the damage you deal for 1 minute. This is replenished after every Long Rest.
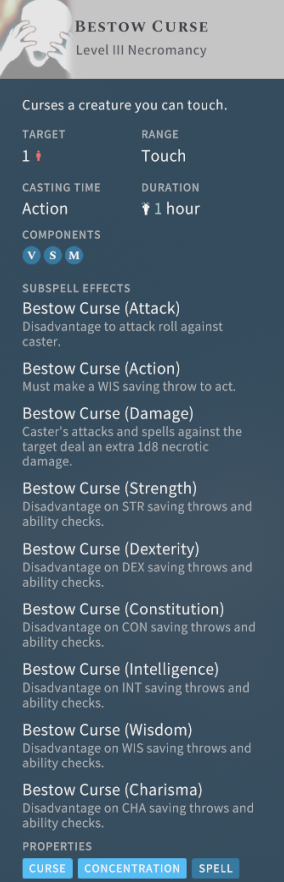
At this level you get to choose two more Level 3 Spells. One Spell that I recommend Bestow Curse, which is a debuff to grant the target a Disadvantage on their Attack Rolls and Saving Throws.
Wizard Level 7 Spells
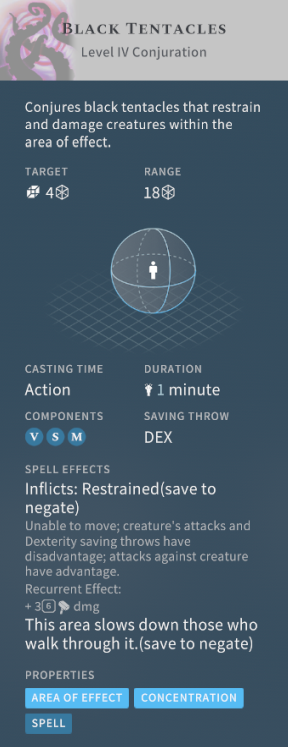
At Level 7, you get to choose two Level 4 Spells. I suggest choosing Black Tentacles, which is an AoE Spell that restrains enemies while inflicting great Bludgeoning Damage at every turn for 1 minute. Not only do these enemies receive Disadvantage while attacking and making Dexterity Saving Throws to break said restraints, but your party also gains Advantage on attacks.
Wizard Level 8 Bonus Feat
At Level 8, you get another chance to choose between the Ability Score Choice or the Bonus Feat. At this stage, I still recommend picking the former to maximize your Intelligence Score, which will become 20, thereby boosting your Intelligence Modifier to +5. This guarantees that the Spells you cast will land on enemies at least 95% of the time.
Similar to the previous level, you’ll be able to choose two more Spells.
Wizard Level 9 Spells
At Level 9, you gain access to Level 5 Spells and you can choose two more Spells to your liking.
Wizard Level 10 Arcane Shock
At Level 10, you gain the Arcane Shock buff where the Damage you deal will always be higher. However, every time you cast a Spell, you’ll have to successfully roll a Constitution Saving Throw otherwise, you take a bit of Psychic Damage.
Additionally, you can pick one Cantrip and two Spells.
Equipment
Weapons
Since you’ll use Spells to deal Melee and Ranged Damage, equipping the basic Quarterstaff is fine.
Armor
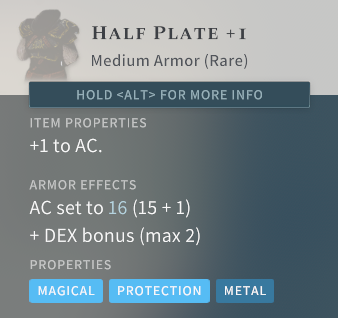
In terms of Armor, you should upgrade your Medium Armor to Half Plate +1. This sets your AC to 16. With the +2 Dexterity Modifier and +5 AC from the Shield Spell, your total AC becomes 23. Because of this, you’re able to protect yourself from enemy attacks most of the time.
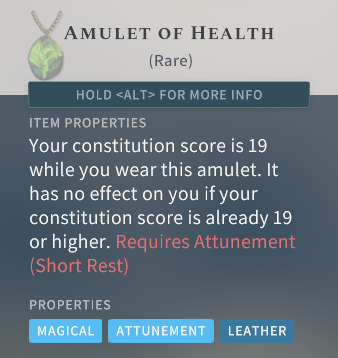
When it comes to Accessories, I highly recommend the Amulet of Health and Sigil Ring of Necromancy because these will help make your Shock Arcanist Wizard much more durable. Both pieces of Equipment require Attunement, which is limited to a total of three pieces of Equipment per character. You can only attune one piece of gear per Short or Long Rest. The Amulet of Health, which you can purchase from Halman Summer of the Antiquarian, raises Constitution to 19, thereby raising your max HP and improving the success rate of Constitution Saving Throws in order to maintain Concentration for your Spells.
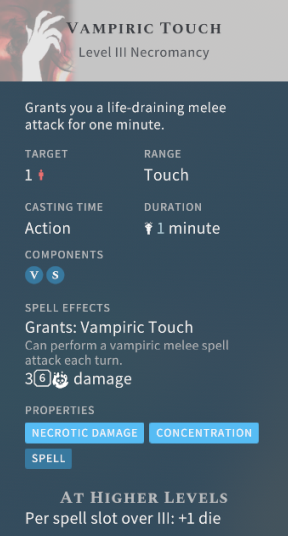
Meanwhile, the Sigil Ring of Necromancy gives bonuses to all of your Saving Throws and to your AC by one each. As such, your total AC will become 24 when you equip this. It also grants you the Vampiric Touch Spell, which lets you inflict Necrotic Damage to an enemy at every turn for 1 minute.
Final Tips
When casting Spells classified as Ranged Hits like Ray of Frost and Chill Touch, always remember to position yourself first at a higher vantage point than your enemies in order to gain Advantage, thereby maximizing your chances of success.
I recommend crafting a lot of Scrolls of Magic Missile so you can use your Spell Slots for other Spells instead. As a Shock Arcanist Wizard, when you use this Scroll, your Arcane Warfare Feature will not be activated. This means that you’ll only deal damage using the lower-leveled version of Magic Missile with three projectiles instead of five for Level 2, for example. Regardless, Magic Missile is still an incredible Spell because it doesn’t miss so you can cast this even if you can’t move to a higher elevation compared to your enemies. You can easily acquire its crafting recipe while exploring Caer Cyflen.
There’s an Equipment known as the Headband of Intellect, which boosts your Intelligence to 19. As a result, you’re able to mostly hit enemies with your Spells. However, you can obtain this midway into the game, which means that your Spells won’t be as effective at lower levels, and you’re only limited to gaining +4 Intelligence Modifier. Overall, going with the Human Race to maximize your Intelligence is still the better option, though you could dump Intelligence until you get this item if you really wanted to.

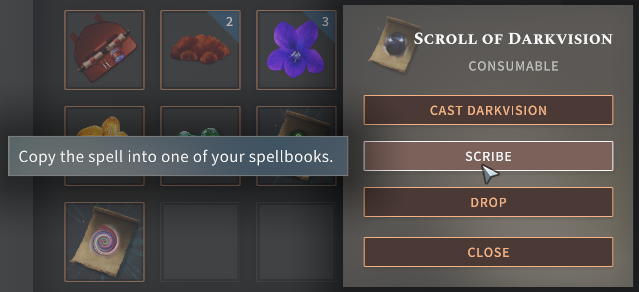
Lastly, remember to copy Spells from Scrolls, which will allow you to increase your pool of learned Spells. You can never have enough Spells learned, and this is a great way to gain more.
Stay tuned for more Solasta Crown of the Magister content as we take a look at Classes and Builds, and be sure to drop by our Twitch channel if you have questions about the game. If you need something specific, check out our Solasta Wiki!
Fextralife
Source link
Related Post:
- Arcanist Build | Pathfinder Wrath of the Righteous Class Guide
- Solasta Sorcerer Build Guide | Mana Painter Class Guide
- Solasta Rogue Build Guide – Shadowcaster
- Solasta Fighter Build Guide – (Spellblade)
- Solasta Ranger Build Guide – Hunter
- Solasta Paladin Build Guide – Oath of the Motherland
- Solasta Cleric Build Guide – Battle Domain
- Outriders Trickster Build Guide | Best Trickster Build Outriders
- Solasta Crown of the Magister Beginner’s Guide: 10 Tips You Should Know Before You Play
- The System Shock remake gets seven minutes of new gameplay • Eurogamer.net